Friday 1 May 2015

Mini Project


Critical Evaluation

This is the playblast of my Mini Project. unfortunately, I could not complete 10 second of animation. This is my work. In my opinion, it could be improved. I apologize.

Sunday 19 April 2015

Video and Still Examples of Staging

In this task I am asked to critique a video and still examples of one of these principles :Exaggeration, Staging, Solid Drawing and Appeal. I chose the principle of staging, because my team members and I presented it in the lesson.

https://www.youtube.com/watch?v=u-SXLaQGg50

In this video, the narrator states that it deals with various elements. According to him, the guidance of the attention of the ones who watch the animation, is one of them. In my opinion this is very important, because the artist demonstrates the events in the timing they desire. I agree that the "far away" (AlanBeckerTutorials, 2015 3. Staging - The 12 Principles of Animation) is very useful for something great that happens, and a "close up"  (AlanBeckerTutorials, 2015 3. Staging - The 12 Principles of Animation) is appropriate for the face. Additionally, if the significant "action"(AlanBeckerTutorials, 2015 3. Staging - The 12 Principles of Animation) is filled with other elements, confusion would be caused. In my opinion, this is also an appropriate statement to be mentioned, because the viewer has to know what happens in that particular time. Finally, according to the narrator, the appearance should also convey the desired message. In my opinion, the acting, as its one of the examples, is more related to exaggeration. However, appearance of a particular space could express a message, but the extravagance is not associated with staging.


Figure 1

According to the video, this "close up" (AlanBeckerTutorials, 2015 3. Staging - The 12 Principles of Animation) describes Simba better. In my opinion this size is very appropriate, because the significant topic is the expression.


Figure 2

Additionally, this long shot describes both the destruction in the great number of the army, but also contains the three protagonists in the foreground. I believe that this shot demonstrates successfully both the significant part of the action, and of course, the difference between the three soldiers and the large army, and also the great destruction coming.


References:

AlanBeckerTutorials (2015) 3. Staging - 12 Principles of Animation [online]. Available from: https://www.youtube.com/watch?v=u-SXLaQGg50 [Accessed: 19th April 2015]

Lasseter J. (1987) Principles of traditional animation applied to 3D computer animation. SIGGRAPH '87 Proceedings of the 14th annual conference on computer graphics and interactive techniques, ACM. San Rafael, CA

Cabral Gomez C. (2013) Cartoon Fundamentals: How to Create Movement and Action [online]. Available from: http://design.tutsplus.com/tutorials/cartoon-fundamentals-how-to-create-movement-and-action--vector-19904 [Accessed: 19th April 2015]


Image References:

Figure 1: https://www.fanduel.com/insider/wp-content/uploads/Simba-the-lion-king-cubs-29352574-704-400.png

Figure 2: http://ashlandsummercamps.weebly.com/uploads/2/1/0/0/21006432/7200016.png?429

Sunday 12 April 2015

"What Is Composition?" - Statement that relates to Staging (Optional)

The relation of "What Is Composition" with Staging

http://onanimation.com/2014/09/03/what-is-composition/

In this task, I am asked to write a statement about the relation of staging in this video. I apologise for the delay.

Initially, the video mentions that the film makers' scope was also to guide the attention and feelings. This is also an aspect of staging, as the editing of the shots and the motion of the characters are used to depict the most significant action.

Secondly, the narrator states that colour was also used to grab the attention and influence the feelings of the audience. That is also connected with staging, because it could be applied to enhance anything significant in the shot.

Reference:

Comez Cabral C. (2013) Cartoon Fundamentals: How to Create Movement and Action [online]. Available from: http://design.tutsplus.com/tutorials/cartoon-fundamentals-how-to-create-movement-and-action--vector-19904 [Accessed 12th April 2015]


Wednesday 25 March 2015

Exaggeration, Staging, Solid Drawing, Appeal - Screenshots from "Up"

Exaggeration


The acting of the characters is intense, with quick moves and overacting facial expressions which depict their excitement . Additionally, the fire shooting and the character who moves the legs upside down, are elements which enhance the joyfulness of the people thanks to the wedding, for the purpose of comical effect.


The motion of the woman is very intense as she suddenly falls on the man and kisses him with plenty of energy , which is efficient to depict her strong character, love for the male one and the happiness she feels thanks to their marriage.

Staging


The shot is very dark in order to match with the sadness of the characters due to the loss of the child, and also, the lighting is stronger inside the room to emphasize the importance of this story part and the acting of the characters.


The male character has already reached the top of the cliff and the female appears lower than him, thus, the framing reinforces her weakness and also her struggle to walk. The sunset omens the end of her life as the day also ends, plus, the inability of the woman to reach the top and the tree probably symbolizes her death, as the tree could be used as a symbol of life and health. This camera placement enhances these messages.

Solid Drawing


The lighting describes the volume of this house as the shadow cast demonstrates the size of the roofs and the other parts of it. The vibrant colours make it more living and also relate to the happiness of the couple.


The texture of the various kinds of fabric is the most successful element of this screenshot. The detail of the seams and folds are described very well, and also, thanks to the rendering, the different kinds of textile are clearly depicted.

Appeal


The joyful facial expression of the woman as she watches her husband depicts her cheerful personality, and also her love for him.


The depressed facial expression of the man portrays his sadness about his moribund wife and reinforces the situation.

References:

Video Source: https://www.youtube.com/watch?v=Kg9lsacQj3k

Gomez Cabral C. (2013) Cartoon Fundamentals: How to Create Movement and Action [online]. Available from: http://design.tutsplus.com/tutorials/cartoon-fundamentals-how-to-create-movement-and-action--vector-19904 [Accessed: 25th March 2015]

Still Images from the video: https://www.youtube.com/watch?v=Kg9lsacQj3k


Good Pose to Pose Example

https://www.youtube.com/watch?v=vwnAd955KE4

In this task I was asked to criticise a good pose to pose example.

First of all, the timing of this animation is very efficient, because it demonstrates the appropriate speed of each action, the ease in and out of the arm, and also the quick, strong motion of the gun. Additionally, the follow through and the overlapping is very successful, as the chest and some other parts of the body also move in different timings after the shooting.

Digger Jump - Blocking and Pose to Pose


Critical Evaluation

This is the Pose to Pose Jump exercise playblasts, using Autodesk Maya. I animated them using the pose to pose technique.

Initially, the main theme of these projects was the Straight Ahead Action and Pose to Pose principle. I set the keyframes on the first video, the blocking, and made the tangents Stepped, so the software did not create any inbetweens. In my opinion, the timing of this exercise is very successful to depict this particular motion. The digger anticipates and stays, which demonstrates the gather of the energy needed for the jump, and also the next poses are quick and strong to portray the jump and fall. Finally, the timing of the follow through as the object is on the ground again is slow enough to show the force due to the jump, and also the appropriate time needed for the object to rest.

The second video is the complete pose to pose animation. I changed the stepped tangents to linear and flat ones, in order to add the inbetweens.  I believe, that the spacing is very efficient, depicting the slow in and slow out of the anticipation and follow through, and also the deceleration and acceleration when the digger jumps and falls. Additionally, the overlapping action is appropriate enough, because the antennae continues to move as the head rotates before and after the jump. Furthermore, I believe that the arcs are very well constructed, as they are curved enough to describe the movement of the object.

However, with the creation of the inbetweens the timing was not correct, because the movements appeared very slow. Plus the digger seems to stay in the air a little bit longer, which creates a slightly unnatural motion. This could be probably due to the sharp point of the peak of the jump, even though I edited the points of the Motion Trail to form the best arc I could. Finally, the overall animation appears smooth, even though I edited the spacing.

Thanks to these two exercises, I was more occupied with the timing and spacing editing. In my opinion, the animation was better with the inbetweens and the corrections of timing.


Digger Jump - Straight Ahead Action


Critical Evaluation

This is the Pose to Pose Jump Blocking exercise playblast, using Autodesk Maya. I animated the object using the straight ahead action technique.

First of all, the main topic of this project was the Straight Ahead and Pose to Pose principle. This was a challenging exercise, because the use of straight ahead action could not produce an appealing animation easily. However, I believe that the timing is successful, even though I could not set keyframes and let the software to create the inbetweens, in order to organize the motion. The anticipation is quick to prepare the object for the upcoming action, also the follow through is very well depicted, demonstrating the force due to the jump. Furthermore, spacing was also a difficult part of this project, because I set keyframes on each frame of the time slider, and placed the positions of the controllers progressively, from the start to the end. However, in my opinion, the ease in and out portrays the movement of the base and the head during the follow through efficiently, as the latter shows an aspect of slow in and out, also the deceleration and acceleration as it lifts and falls, depicts the jumping very well.

On the other hand, this technique created various problems. Firstly, I could say that the arcs are not curved enough, and the animation appears abrupt. Even though I edited the points on the Motion Trail, the arcs were still straight. Secondly, I believe that the spacing of the head is not correct. This could be probably because I animated it in various positions when it moves forward before the jump, or backwards when the digger is on the air, and forth again during the fall. Additionally, I did not have a great control over the rotation, because the ghosting of the controller could not depict the poses of this attribute. Thus, the whole animation of the head is odd and unnatural in some parts. Thirdly, this animation has no secondary motion, due to the fact that it was very tough for me to animate the antennae frame by frame, and also produce an appropriate movement.

This exercise was a great opportunity for me to deal with spacing, when actually positioning the controllers progressively. Additionally, using Motion Trails and ghosting, I could be more occupied with the ease in and out.

Wednesday 18 March 2015

Thought of You - Comments about the Emotions promoting and Arcs

https://vimeo.com/14803194


The task of this assessment is to comment the emotions that this animation is promoting, and also, if the use of the arcs influence the ones that I felt.

This animated short evokes various emotions. First of all, the male character waking up and touching his head gives a feeling of desperation. So do the next dancing moves when he dances alone, and the actions give the impression that he moves very heavily, probably, expressing his depression. These continuous moments when he loses the female dancer, promote again feelings of despair and sadness. Additionally, the deformation of his arms and legs also enhance these negative emotions. However, as the two characters dance together, they evoke feelings of tenderness. In the end, the emotions of depression are depicted by the female character, who kneels and touches her head, in a similar way as the male one in the beginning.

The arcs are a crucial part of the creation of these emotions. They describe these slow, heavy movements of the male character in the beginning and of course, every time this character is depicted desperate. They also enhance the feeling of tenderness when they contact each other and dance together.  In addition, the arcs reinforce the fluidity of the female character, whose texture is similar with smoke in the start or like water in some point and they help to give the impression that the character is made of these elements.

Personally, I felt thrill when watching most of the animation, especially when they danced together. I also felt sadness when watching the male character depressed or alone.

In my opinion, this is a very touching animated short, because it describes these kind of feelings, and also, the arcs and this slow action reinforce the emotional state of the characters. The music is also an important factor of this success, because the characters dance in the rhythm, and also the lyrics may relate with the concept of thinking and losing.   

Arks - 02 Ikebal


Critical Evaluation

This is the Arks - 02 Ikebal exercise playblast, using Autodesk Maya.

Initially, the main theme of this project was the principle of the Arcs. However, this was a complicated animation, because it contained a number of other principles. First of all, I animated the anticipation of the action by rotating the head of the machine, and I believe, that the timing is very efficient, because it is fast enough to prepare for the next anticipation. I achieved to create an appropriate second anticipation, as the ease in and out is very well structured to depict the energy that the object gathers in order to hit the ball. In my opinion, the reset of its original position is also successful, thanks to the timing which is slow enough and of course, the spacing, portraying the machine returning to its initial pose after this great strike.
I created a Motion Trail and moved its points in order to form a more curved arc. I believe, that the arcs are obvious enough, even though the machine motion is more mechanical than the motion of a living being.
The secondary action was also very important. I animated the antennae and also created some overlapping action, in order to depict the different timing of these separate movements. I did the same with the head rotations. In my opinion, the follow through in the end was also successful, because it depicts the gradual energy loss, while the positions of the antennae poses are decreasing.

However, I believe that the action of the machine hitting the ball is not very strong. Even though I adjusted the spacing using the Graph Editor, and also viewed the ghosted positions through the frames, the action still appears smooth. Additionally, the controller of the ball had not the rotation attributes in the Channel Box, so I could not orient it, and its motion is unnatural. Furthermore, I believe that the antennae stop is not smooth enough, this would be probably a problem with the timing.

This project was a great opportunity for me to be occupied with many different principles in order to create a coherent motion.

P.S. I wrote the name of the demo version exercise in the introduction.

Arcs - Ball


Critical Evaluation

This is the Arks - 01 Ball exercise playblast, using Autodesk Maya.

Initially, the main theme of this project was the Arcs principle. In order to make the ball squashing, I applied a squash deformer to the mesh and created set drive keys, connecting the Factor with the Squash attribute of the controller. I believe that the anticipation is efficient, because it depicts the energy that is necessary for the object to gather, in order to make this leap. I set the keyframes, but the arcs were straight lines. However, by adjusting the curves in the Graph Editor, the arcs had a more curved shape. Additionally, I used the Motion Trail. moved its points to enhance the curvature of the motion. I believe that the arc is successful, because it makes the motion more believable and not linear.

Furthermore, I assigned another squash deformer, created a new attribute in the controller and set driven keys to make the ball squash and stretch in the end. I could not use the previous deformer, because the sphere rotates as it jumps. In my opinion, the follow through, depicted by the squash and stretch as the object lands on the surface again, is very efficient for the animation. The ease in portrays the power due to this great leap.

However, I believe that the spacing is not very successful when the ball falls on the ground. I used the Graph Editor to adjust the spacing, and also ghosted it to view the distribution of the frames, but, the fall seems a little bit linear. This problem could be probably caused by the timing for this action.

This exercise was a great opportunity for me to be occupied with the Motion Trail editing for the curvature of the action. Plus, I was also occupied with the concept of arcs, and had a clearer image of what this principle is.

Secondary Action - Tail Ball


Critical Evaluation

This is the Secondary Action - Tail Ball exercise playblast, using Autodesk Maya.

Firstly, the main topic of this project was the Secondary Action principle. In this case, main action is the ball jumping on the floating surface, and the secondary action is the motion of the tail, because it is not necessary for the important action to happen. However, various kinds of principles are also evident in this animation. In my opinion, the anticipation as the ball squashes and rotates in the beginning of the action, is very efficient, because the timing is slow enough for the object to gather its energy in order to make the leap. Furthermore, I moved the floating surface further, because the arc was not curved enough. I used Motion Trail, moved the points of the curve to reshape the arc, and I believe, that the movement is more believable and less mechanical, as it would be if the arc was straight. Additionally, the follow through of the landing is also portrayed by the squash of the ball, and its timing and spacing is appropriate enough to demonstrate the power of this leap. The action is not very fast or slow. In terms of spacing, I could say that the ease in helps the depiction of this energy.

On the other side, I believe that the tail motion is not very successful. This would be probably due to the fact that there is no overlapping action. Unfortunately, I did not know how to achieve this technically, thus, all of the joints of the tail move at the same time (their key positions are on the same frame). This also lead to another problem. I could not focus on the spacing of each joint rotation, thus, their motion is not so relative to the power of the squash and stretch of the main action. In addition, the tail could be more curved when the object is in the air or on the floating surface. However, I believe that the secondary motion in the beginning is more successful, because the problem with the overlap is not very obvious, and also the timing is coherent with the main action; the tail stretches forward as the ball is squashed, thanks to the anticipation, and stretched backwards as the ball stretches releasing the energy forth to leave the ground.

I would prefer to understand my mistakes and upload an improved version of this project.

Wednesday 11 March 2015

Secondary Action - Dog Tail


Critical Evaluation 

This is the Secondary Action - Dog Tail exercise playblast, using Autodesk Maya.

The main topic of this project was the secondary action. I began by animating the main action, which is the dog walking. As the story develops, the main action is the character hitting on the box. I believe, that the animation when the character is lifted in the air should be stronger, because in this animation, it appears smooth enough. Additionally, the main action in the end is the dog which attempts to understand what happened, and the motion of the head is very effective, because the slow in and out make the motion believable enough.

While the motion of the walking was completed, I continued with the head turning. This movement is the secondary action of the animation, because the dog is sniffing around and it is not a significant part of the plot. In my opinion, this motion is not realistic enough, because it appears linear. even though I adjusted the spacing in the Graph Editor. After the dog is on the ground again, the secondary actions are the ears lifting and the motion of the tail. In my opinion, the animation of the ears is very efficient, because it portrays the surprise of the dog due to the hit, and the appearance of the cube which it had not noticed, also the timing and spacing are appropriate, giving a fast and believable motion. Furthermore, the animation of the tail is also a successful secondary action. Firstly, it shows the tension of the dog due to the conflict. Secondly, the timing is fast enough and makes the action stronger. However, the stopping of the tail movement in the end is slightly abrupt.

This was a great project because I was occupied with the separation of the main and secondary action and the different elaboration of them.


Dinner by Birdbox Studio - Critical Understanding of Secondary Example

https://www.youtube.com/watch?v=Rp30_gF1GcY


The task of this assignment is to critically understand the secondary action from the Dinner animation by Birdbox Studio, and find which the main and secondary action is.

Firstly, the main action of the dog is the running as it approaches its food, and the eating of it when it reaches the plate.Additionally, as it eats, it moves its tail, which is the secondary action. This animation, is not necessary for the development of the plot, and it does not help the motion of the character while eating the food. However, I believe that this movement adds more character, because it demonstrates the joy of the animal while eating, and also gives a more natural feel to the animation, as dogs move their tails when in excitement.

Secondly, when the plate goes under the furniture, the dog wants to take it back. Thus, its main action changes from before, because the plot also changes. Its main action is supported with various movements, such as the stretch of its legs in order to reach the object and the use of other objects to help it get the plate back. Furthermore, there are also various secondary actions. For example, the motion of the tail, which has the same scope as before. In my opinion, the barking is a very efficient action, because it depicts its desperation, also the eyes blinking makes the whole animation more realistic, as its an appropriate action for most living beings. Plus, in my opinion, the way it moves its tail and ears down is also a secondary action, which helps the demonstration of disappointment, same for its facial expression. However, the same body parts and the expression on the end, when the plate is under the opposite furniture, have a different aim, they are very efficient secondary actions, because they portray the depression of the dog.

Wednesday 4 March 2015

Follow Through and Overlapping Action - Mime Comedy critical evaluation

https://www.youtube.com/watch?v=FPMBV3rd_hI

 In this task, I am asked to critically evaluate the follow through and overlapping action of a mime comedy performance.

Initially, on 1:18 the overlapping action is effective enough, as the mime firstly leans his shoulders, torso, lower body and the waist slightly. Until 1:30, all of his leanings are very efficient in order to give the impression of turning the car while driving. On 2:08, the overlapping action is very well used while the performer attempts to make these dancing movements, as the energy begins from the pelvis and continues to the lower body, torso, shoulders and head. Same for 2:07 when the motion becomes more complicated because he moves his head left and right. Between 3:58 - 4:05, the different parts of the body move in different times, and they clearly create the feel of the comic electrocution. Furthermore, between 4:11 - 4:36, the running is also very well performed, because the mime moves the parts of the body in various times and also gives the essence of travelling a real distance to reach the car. On 4:28, the overlapping action helps him to depict the great force applied to him because he hangs on a running car.

Secondly, on 2:04, the follow through is very well performed, as the mime stops his main body and his head still moves forward and stops, due to the brake. However, it is probably exaggerated a little bit, but would be for the sake of the performance. Additionally, on 2:36, the element of follow through is better portrayed, when the mime attempts to open the locked door and stops due to the resistance, and his head, shoulders, torso, lower body and even the hips move for a short period of time backwards, then forward and stop. However, on 2:47 when he opens the door using a crowbar, he could make the follow through even more intense, by probably moving the various parts of his body, similar with his attempt of opening the locked door with the hand, previously.

Follow Through and Overlapping Action - Cape Ball


Critical Evaluation 

This is the Follow Through and Overlapping Action - Cape Ball exercise playblast, using Autodesk Maya.

Initially, the main topic of this project was the principle of follow through and overlapping action. The first bend was animated from the start, thus, I had to animate the Onoff attribute for the ball to leave the board, as it bends up and the sphere is thrown in the air. I created bounces by setting keys on Translate X and Y axes, and used the Motion Trail to select and move the keyframe points on the curve, editing the curvature of the motion. Additionally, I set a keyframe on the last key of the translation to rotate the sphere due to the thrown.

On the one side, I believe that the bending of the board after the ball leaves it is very effective. I only used 3 frames for each bend, and the distance between the extreme poses was decreasing, as the power was decreasing, too. Furthermore, in my opinion, the spacing of the last bounces is appropriate enough to give the impression of a physics based motion.

On the other side, I faced many problems. Firstly, I could not understand how to animate the cape controllers effectively in order to achieve the desired motion demonstrated in the demo video. The animation is not efficient from the beginning, because the moving cape passes through the surface of the board, as the latter bends down. In addition, I approached the animation using my own impression of movement, but, I did not stretched the cape as the ball was rotating before it reaches the ground, because the poses of the rotation were not similar with the ones of the video. Plus, the rotation of the sphere in the start is also problematic, probably due to a technical issue. In my opinion, the spacing of the sphere as it falls is a little bit linear, I attempted to manipulate the curves of the Translate Y attribute, but the distance between the poses was not increasing, as I observed it through ghosting. Furthermore, the ease in as the ball leaves the board is not constructed properly and I could not give the impression of energy released due to the throw.

In believe that this was a very challenging project and I would prefer to understand my mistakes and make a second attempt to complete it.

Follow Through and Overlapping Action - Hammer


Critical Evaluation

This is the Follow Through and Overlapping Action - Hammer exercise playblast, using Autodesk Maya.

Firstly, the main topic of this project was the principle of follow through and overlapping action. I set keyframes on the Rotate Z attribute of the spring mesh, but also assigned it a bend deformer, in order to reinforce the follow through of the object as the hammer hits the ground. I used 3 frames for each up rotation and 3 for each down rotation, and the same timing for the bend attribute. My purpose was to create a coherent motion between the deformer and the orientation. That is the reason that I used the same timing and the same spacing, making the tangents flat and unified, in order to set the motion contiguous, except from the ones where the follow through begins, making them linear to create the slow in effect. When the curves had the same shape, I selected the handles of both curves and manipulated them together.

One the one hand, the motion of the spring depicts the element of follow through very effectively. I achieved that by viewing the poses through the frames using ghosting. In my first attempt, the poses were the same as the object was moving, but the effect of this movement is decreased due to energy loss.

On the other hand, I animated the spring from the start of the animation before the hammer started rotating, because the movie would be played in a loop to create continuous motion. This probably resulted to a less flowing motion, because the spacing between the last and the first keyframe of the timeline is maybe distant. Furthermore, the vibrations are not the same, because the hammer begins to rotate early enough, so there is no much time for it to rotate and bend, as for the second vibration.

In my opinion, thanks to this project I was occupied with the follow through principle and spacing manipulation.

Diving into the Pool - Improved version


Critical Evaluation

This is the Anticipation - Diving into Pool exercise playblast, using Autodesk Maya. This is the improved version of my previous attempt, while this project is more similar to the demo one.

Initially, the main topic of this project was the principle of anticipation. In my opinion, the stretch, squash and stretch again of the ball before it jumps is very effective, because it creates the impression of energy gathering due to the upcoming diving. Additionally, this anticipation of the anticipation enhances the essence of the power which is necessary to be gained. Furthermore, I believe that the spacing is also appropriate to depict the jump. The slow in as the sphere leaves the board is very well constructed in order to portray the impetus.

On the other side, the distance between the last frame where the sphere is on the board and the first where it is on the air is very long. However, the squash and stretch element could smooth out this whole motion. I also believe that the spacing during the fall could be manipulated more to demonstrate the speed due to the gravity, but I made various attempts and concluded to this depicted, because the extensive curve editing resulted to jagged motion.

In the end, this different approach of the project was an opportunity for me to be occupied with spacing and ghosting even more, also manipulate these various attributes to create the feel of anticipation.

Wednesday 25 February 2015

Diving into the Pool


Critical Evaluation 

This is the Anticipation - Diving into Pool exercise playblast, using Autodesk Maya. Due to some technical issues, I used the ball of the previous exercise (Anticipation - Small and Large) and its rig to animate it. I also hid the other ball and elements that I did not need in this particular scene. I modelled a simple ladder and a board, also a small pool using the Revolve tool, after shaping it by a CV curve, according to the demo video.

The main topic was the principle of anticipation. In addition, I used a video of diving athletes as a reference, because I wanted to challenge myself and try different kinds of motion. According to the video, the athletes run across the board, jump and stretch their arms vertically, bend down and jump off the board, rotate and dive into the water. This could be very difficult to animate, however, I anticipated the anticipation by stretching the ball before it squashes to leave the board. This could enhance the element of power building in order to jump. I stretched the sphere before the elevation and rotated it as it rises the air to make the impetus stronger. I created a slow in for the jump, and the distance between the last frame when it is on the board and the next one is great enough to demonstrate the power that was gathered during this anticipation. I squashed the ball when it is on the air because it comes to a more passive state due to the power, and stretched it again when it falls inside the pool, as it releases the energy which was built during the rotations on the air.

This exercise was a great challenge for me to try different kinds of motion, and also a very good opportunity to be occupied with the principle of anticipation, and manipulate squash, stretch and timing to make the motion as believable as it is possible.

Athletes Diving reference video:

https://www.youtube.com/watch?v=wTcatD-anCw


Small and Large Anticipation


Critical Evaluation

This is the Anticipation - Small and Large exercise playblast, using Autodesk Maya.

Firstly, the main focus for this project was the depiction of anticipation. As the task was to create a smaller and a larger anticipation, I decided to give a specific attitude to each of the balls by manipulating the squash and stretch, timing, ease in and out.
I began with the exaggerated example. According to the demo version, one of the balls was squashed and stretched intensely and left the ground very fast thanks to its power. Thus, I chose to follow this example on my first ball, however, I focused more on the timing from the start. The ball is squashed, but it needs some time to be flattened and it also stays in this position for another period of time. Thanks to this, it gives the impression of building its power to leave the floor. Additionally, it keenly stretches and elevates, demonstrating great force. As for the spacing, it slows in and out when flattens, thanks to its impetus and slows in when it jumps of the floor, portraying a great amount of speed due to the large anticipation.

For the second ball, I followed the small anticipation example. I squashed it a little, in order to demonstrate a weaker gather of energy to leave the ground. Due to this, it does not jump very high, despite the fact that I used slow in when it squashed. My purpose was to depict its thicker mass and harder material.

By the completion of this exercise, I was occupied with the principle of anticipation and I began to understand it better. Plus, I experimented with the timing for each action and the squash and stretch element more. I believe, that this experience would be helpful when I would apply them on character animation.

Slow In and Slow Out Tutorial


This is the tutorial of one of the previous exercises on slow in and slow out. I decided to make a tutorial with images and text explaining all of my steps for the completion of this project.
I apologise for the delay of this assessment.

The exercise is the SlowinOut Newton's Cradle and I used Autodesk Maya to complete it.

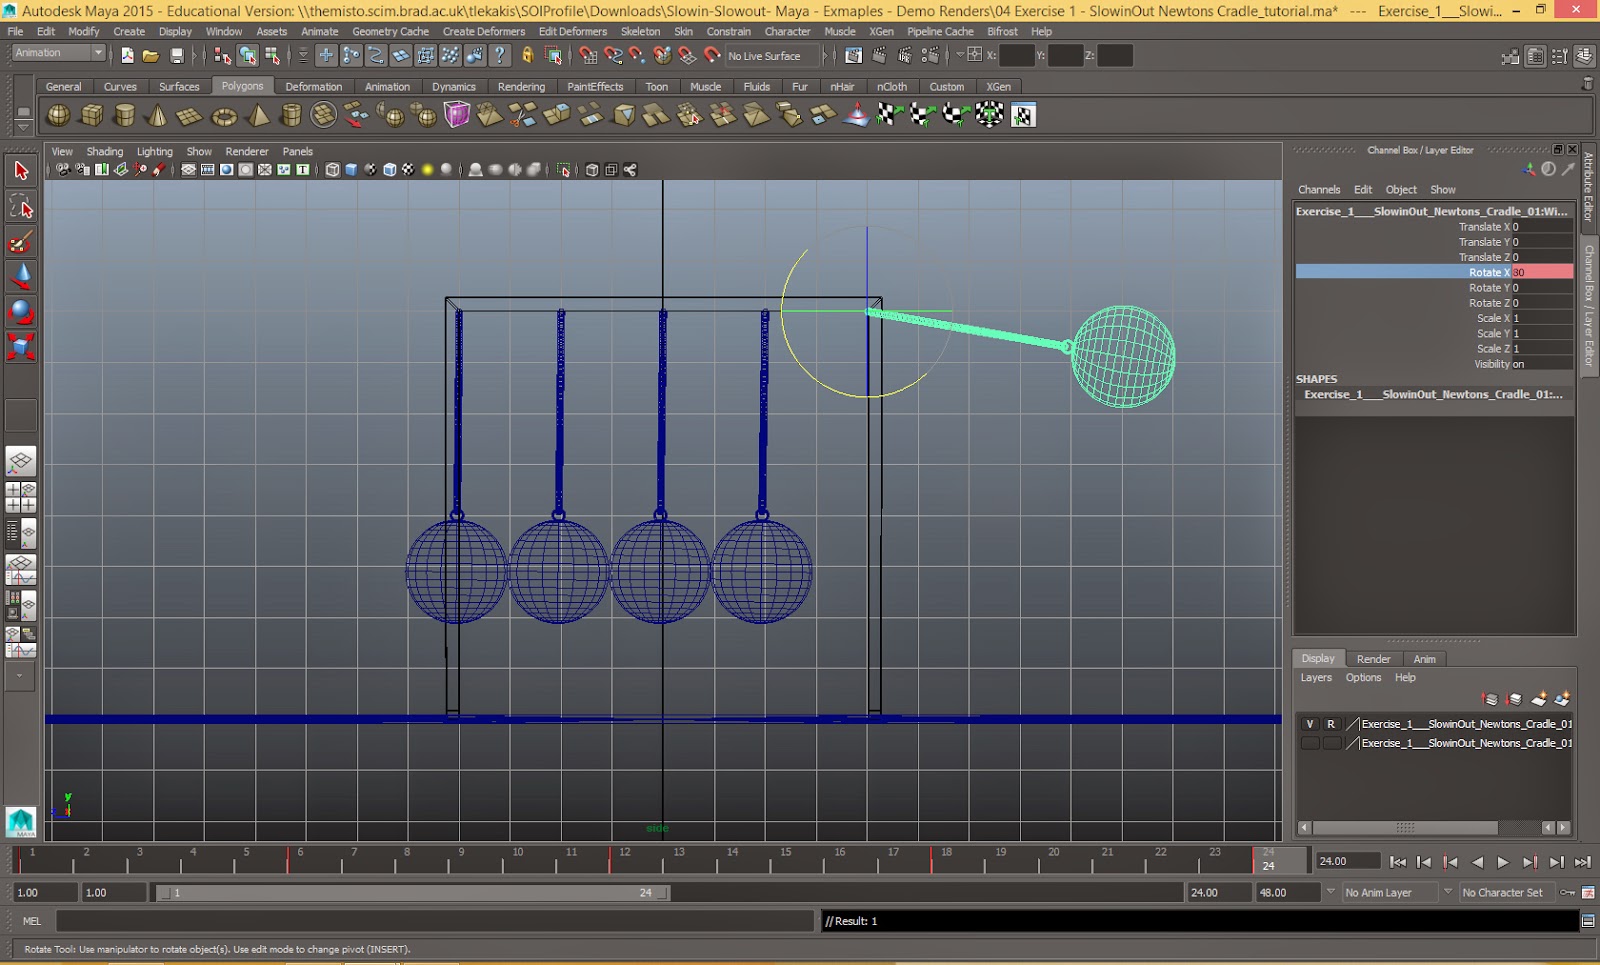
Initially, this is the scene with the cradle, lights and cameras.


Begin by selecting each wire of the balls, except from the right one and set a keyframe on frame
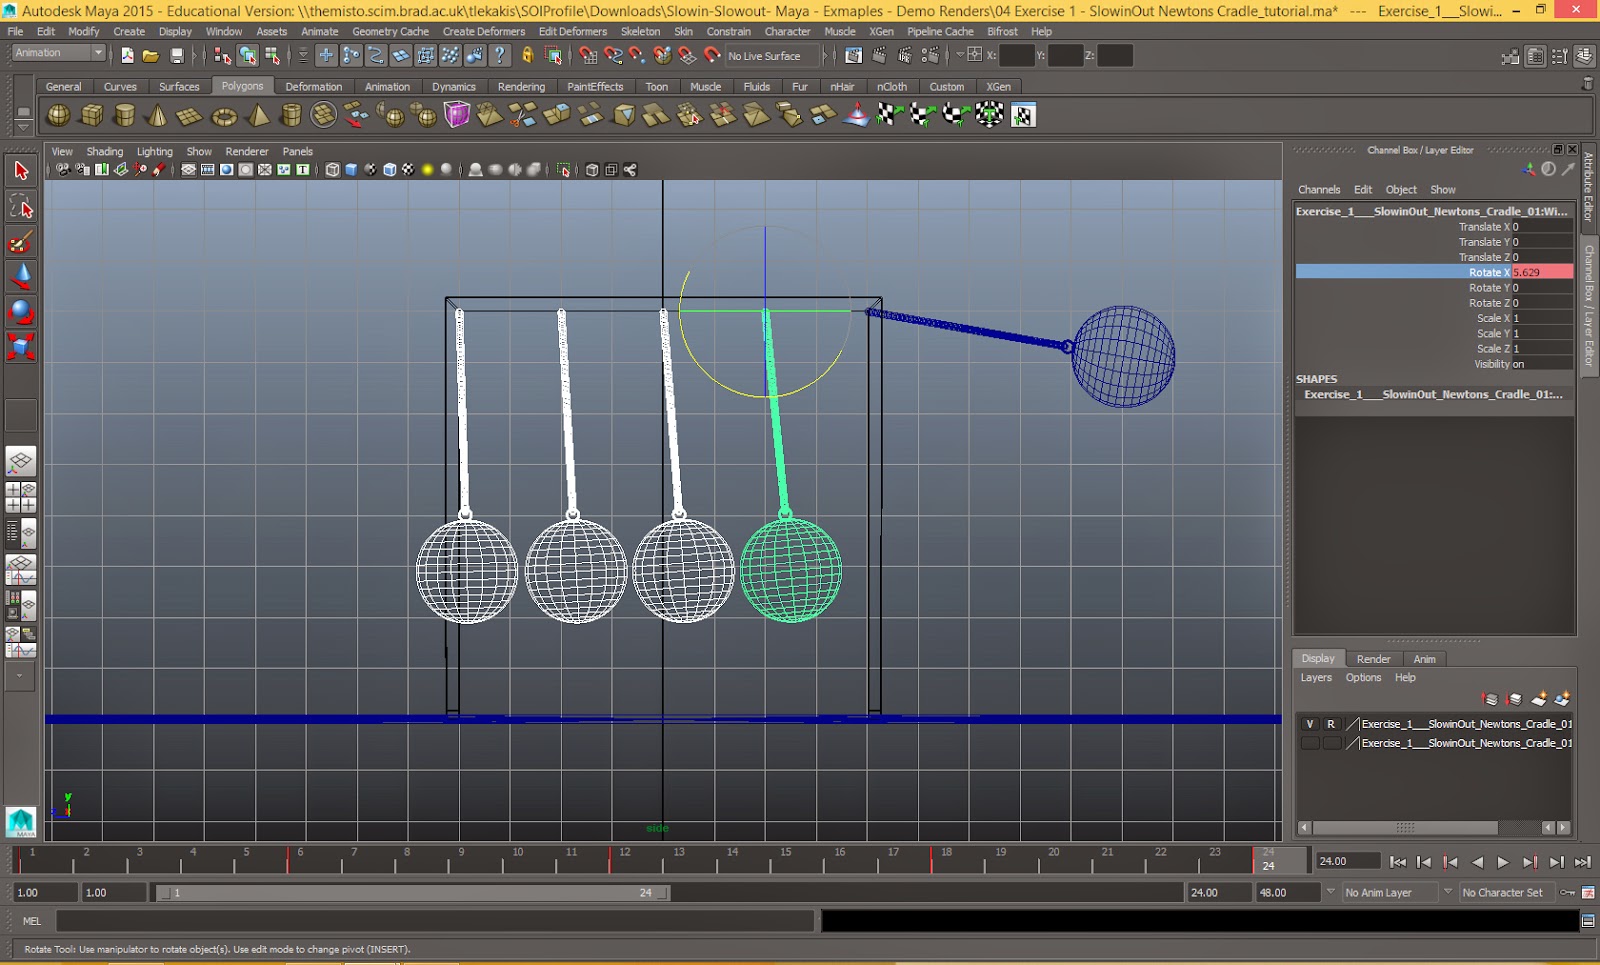
1 by choosing the Rotate X attribute, right click on it and press Keyframe Selection. This will enable you to set a keyframe only on this value, because this is only needed for this animation. Go to frame 6 and rotate them in order to contact. This would create the motion of impetus as the energy is transferred through each ball. Select the right outer wire and set a keyframe on frame 1, then on frame 6 rotate it to contact the balls, and set a new keyframe. With this action, you have created the first hit of the one of the outer balls.


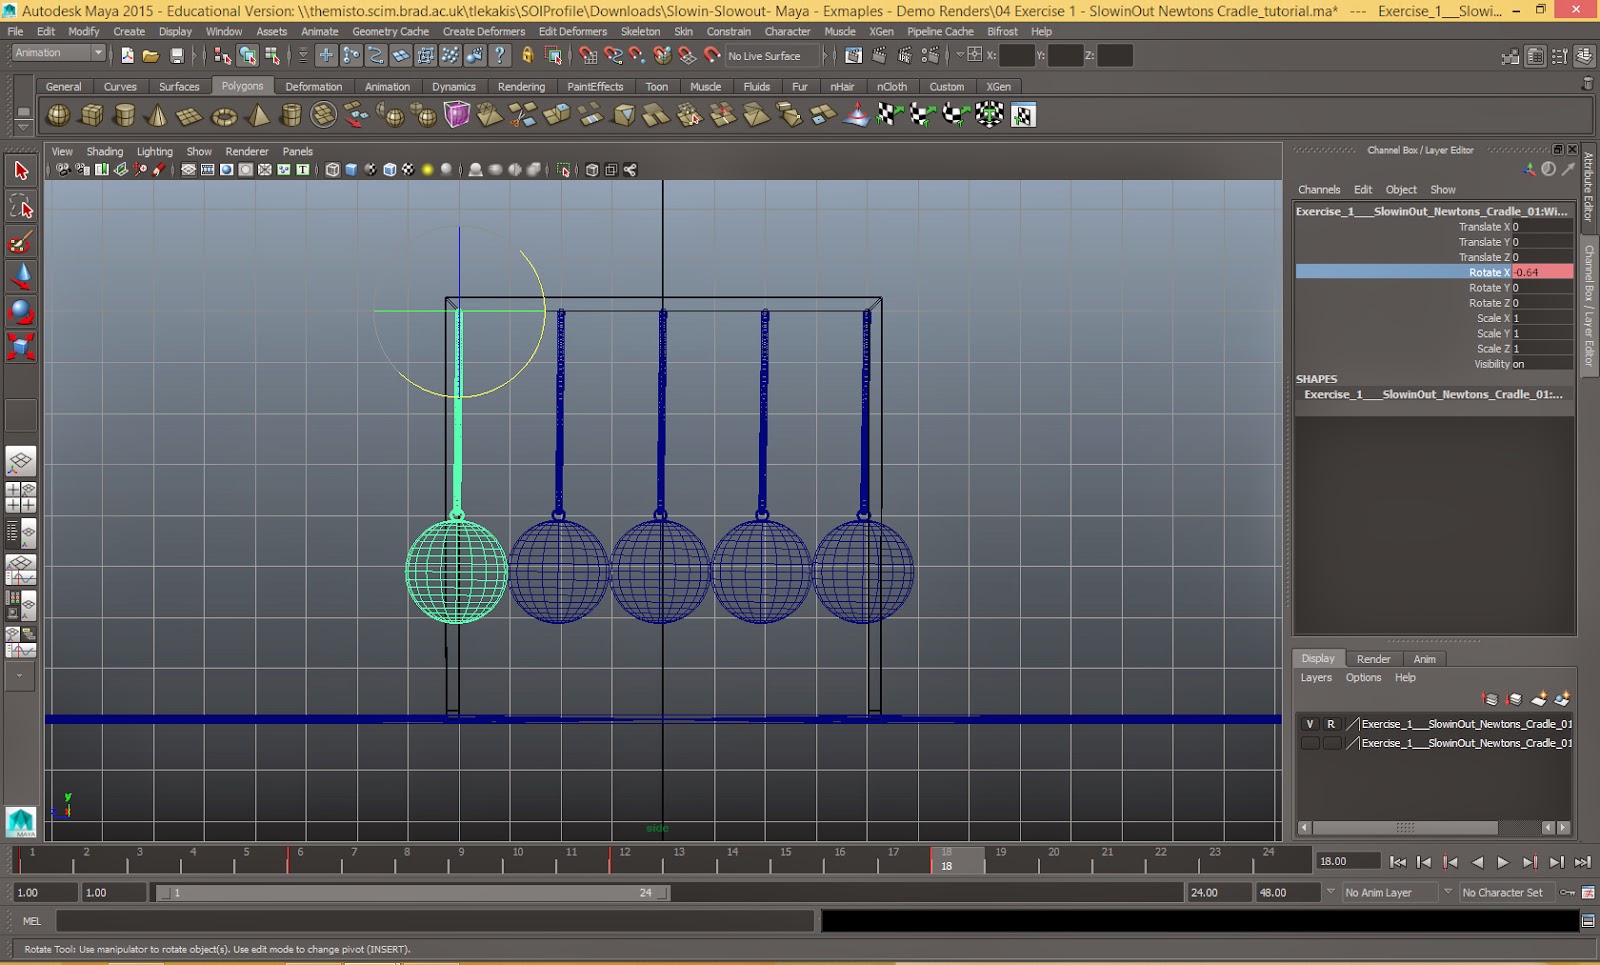
 Next, go to frame 12, rotate the wire of the left outer ball by -80 degrees and set a key. This is because this wire has to be rotated similar with the degrees of the opposite one, as the energy is firstly transferred with no reduction. Select the wires of the remaining balls and rotate them slightly to give the impression of the power transferred on frame 12 and set a key , and make them contact again on frame 18.


Additionally, animate the remaining wire to contact the other balls, creating the second hit of the cradle on frame 18. Copy and paste the attributes of each object from frame 1 on frame 24, so when the loop animation is generated, the motion will repeat continuously.

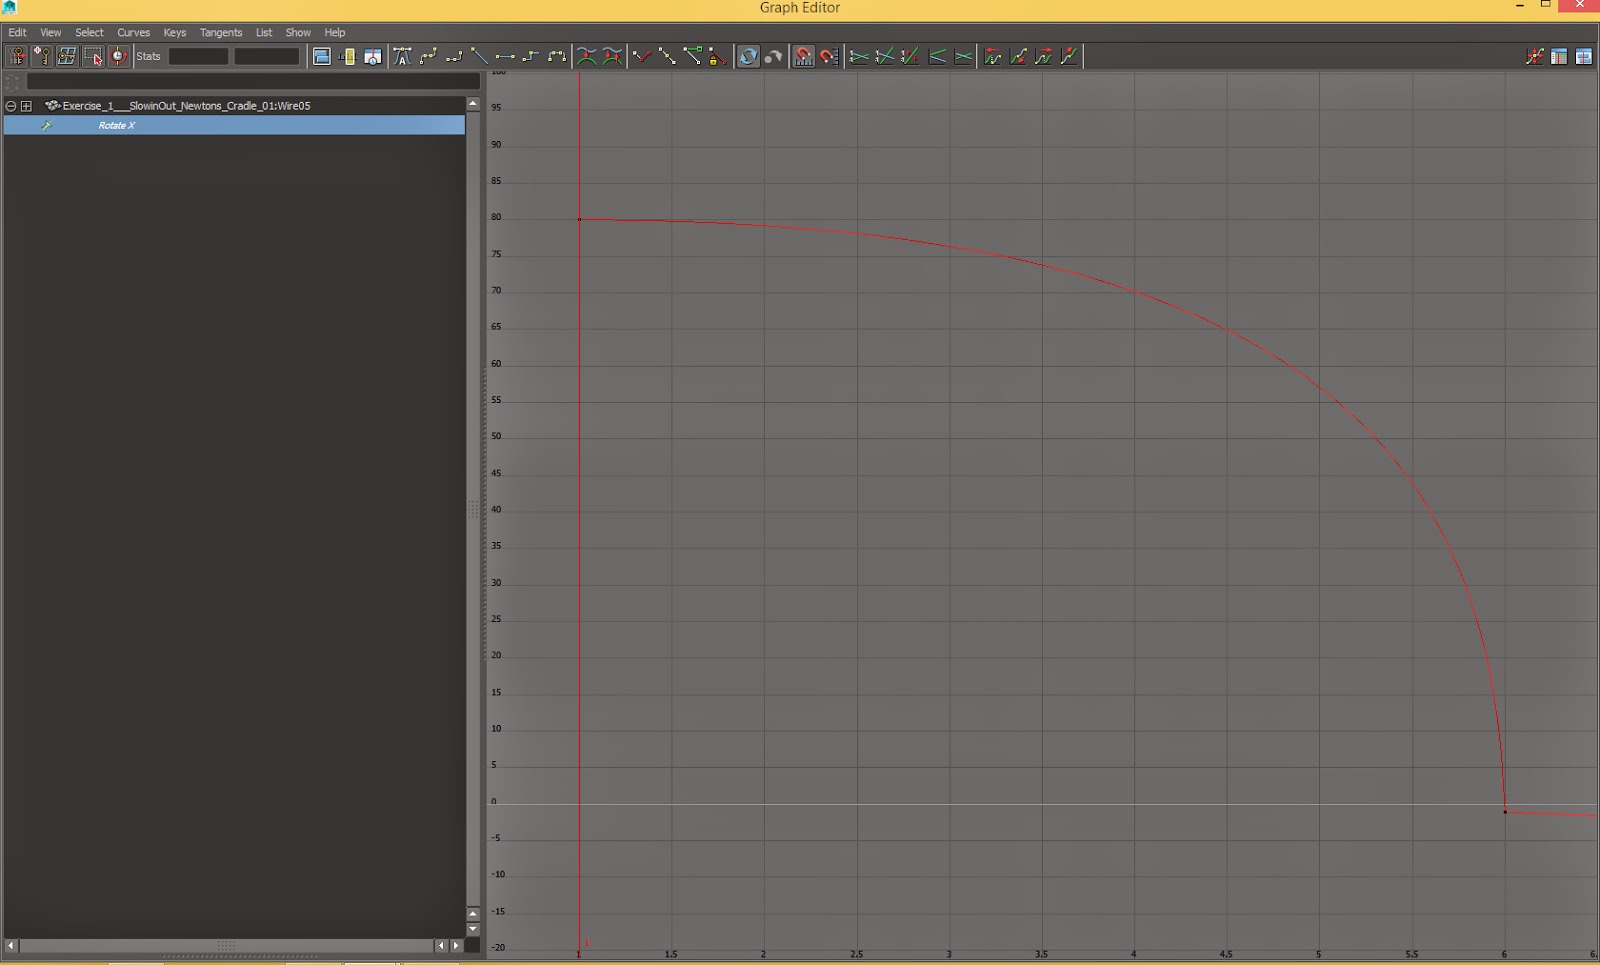
The timing is set, however, this is the moment to edit the spacing. Select the wire of the right ball on frame 1 and navigate to Window - Animation Editors - Graph Editor. Choose the Rotate X value from the menu on the right, so you can isolate only these curves (this would be more efficient if you had to animate different attribute of the same mesh) and draw a drag box to choose all of them . After that, navigate to the Curves menu, select Weighted Tangents, then navigate to the Tangents menu and select Break Tangents and Free Tangent Weight. This will make you have a greater control over the curve manipulation, also the broken tangents will enable you to edit each one separately, depending on each motion. The ball accelerates when hitting the balls, so select the tangent on frame 1 and make it Flat from the icons menu above, also select the tangent on frame 6 and make it Linear. Grab the handles to edit the curve, as the image shown, to reinforce the acceleration.

The animation of the other wire is the opposite. The energy is transferred on the left ball, so it moves very fast in the beginning and decelerates. Apply the same commands about the tangents, however, you could unify the tangents on frame 12 to make the changes of the ease at the same time when the ball reaches its extreme pose and accelerates again. Thus, make the tangent on frame 6 Linear, and the one on frame 12 flat and move the Flat ones by pressing the Shift button to maintain the handle horizontal and the frames close to each other, forming an ease in and an ease out from frames 6 to 12 and 12 to 18 respectively. Select the handle on frame 18 and make it Linear. Move the handles, as the image shown, to enhance the deceleration and the acceleration of the ball. Choose the right wire and create a deceleration, because the ball is hit and reaches its extreme pose again.
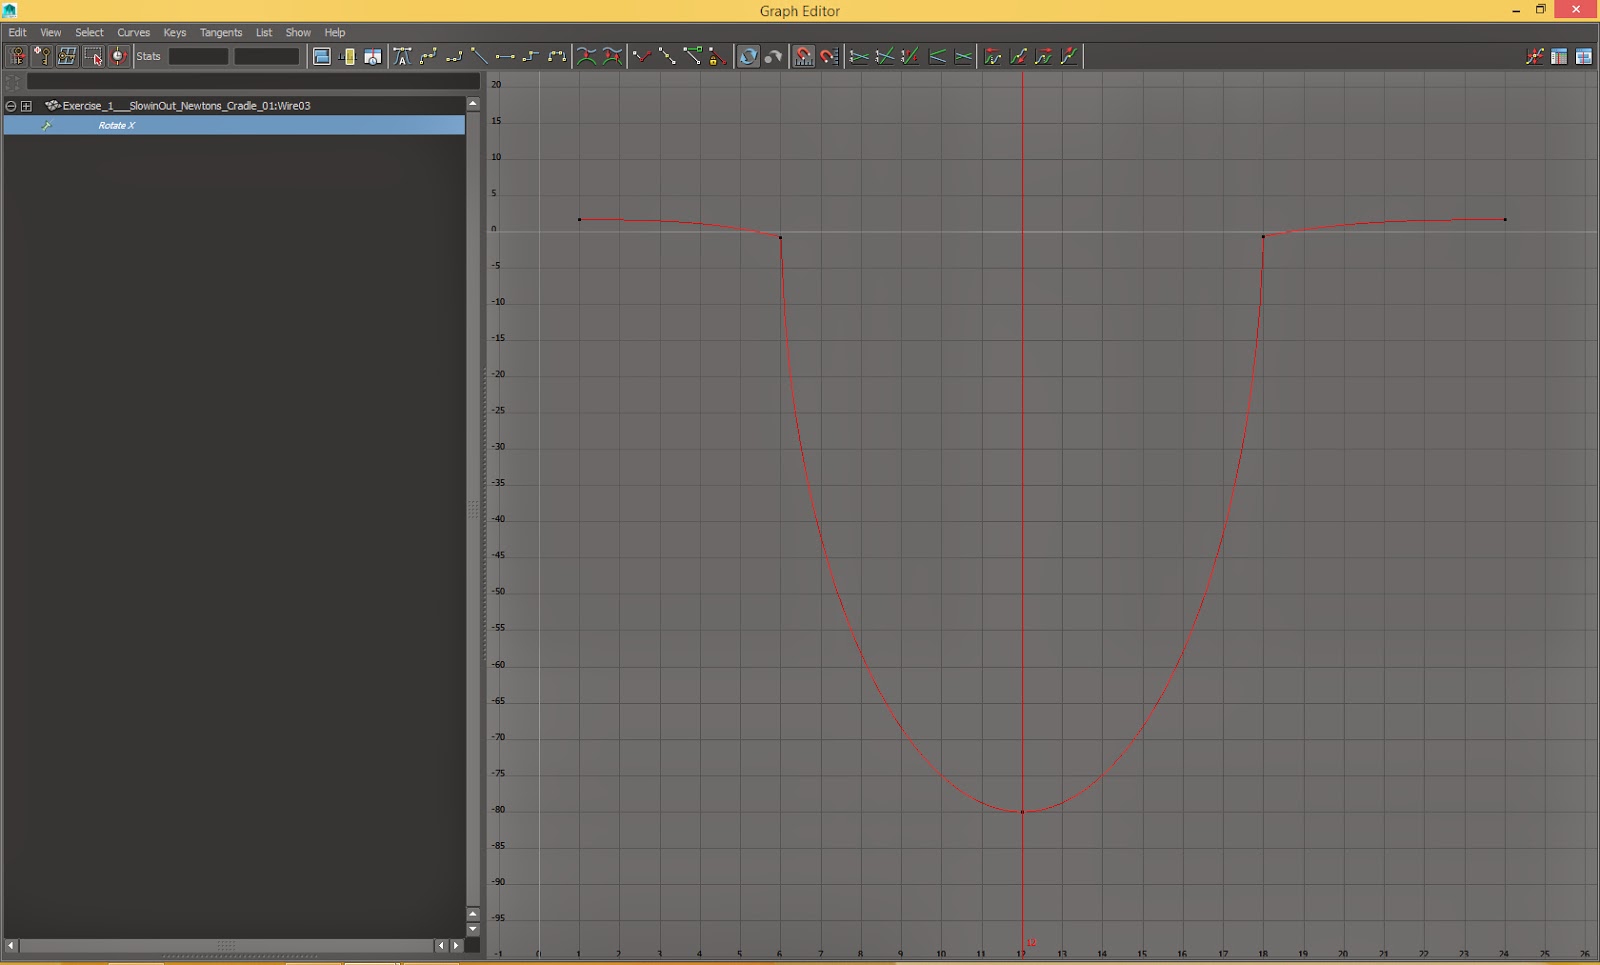
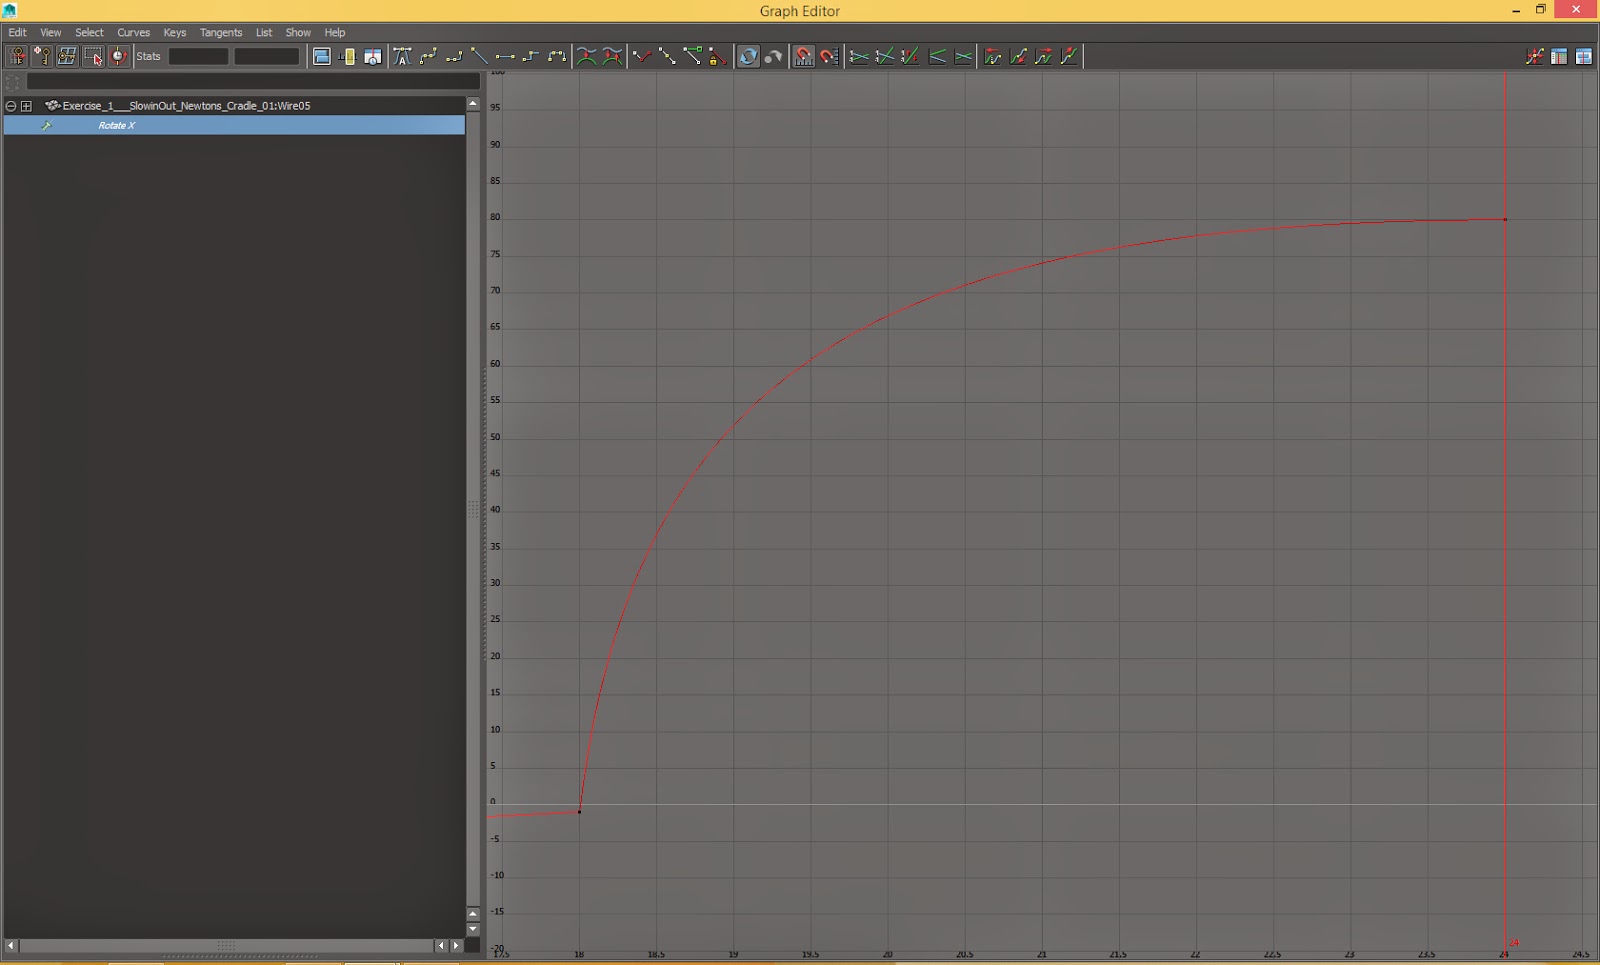


In order to improve your animation, you could choose the balls and set keyframes on rotations. This will create a smoother flow of the motion, and will depict the energy passing through the objects better. Edit the curves in the Graph Editor according to the ones of the wires, in order to create a coherent motion.


Grab the little box of the Range Slider on the right and make the viewable timeline shorter to 1-23 frames. Because the frames 1 and 24 are the same, the final playblast video would play the same frame two times and the animation would appear very odd. Right click on the timeline, choose Playblast to create the animation.

This is the playblast of the complete animation.


Wednesday 18 February 2015

Slow In - Out Newton's Cradle


Critical Evaluation 


This is the SlowinOut Newtons Cradle exercise. I used Autodesk Maya to complete the animation.

The basic principle for this project was the Slow In and Slow Out. After watching a reference video in 300 fps, I realised that the middle balls of the cradle actually move. Thus, I rotated the outer ones which hit the others, but I also animated the rest of them in order to create a more believable motion. I manipulated the splines using the Graph Editor and formed an ease in as the ball is hit and ease out when it hits the other balls. The combination of both slow in and out give a more natural impression of movement. Furthermore, I rotated the outer balls and enhanced the flow of the motion.

Thanks to this exercise, I was occupied with the Graph Editor, spacing, and I also had the opportunity to focus on the reference video in order to understand the motion better.

Tennis and Cannon Balls Falling Stairs


Critical Evaluation

This is the Tennis and Cannon Ball Falling Stairs project. I created this animation using Autodesk Maya.

Initially, the most important principle was the slow in and slow out. I watched some videos and used them as a reference for the tennis ball animation and observed that the ball makes a quick bounce. In order to achieve this, I used the Graph Editor and manipulated the splines by making them flat on the top and linear as the ball makes contact with the stairs and leaves it. As for the timing, I believe that 8 frames are appropriate for the first falls, but the ones in the end where shorter as the ball loses its momentum. Additionally, I created Motion Trail because I wanted to change the modify the movement interactively inside the viewport. This command also enabled me to edit the curvature of the bounces. Furthermore, I created ghosting in order to watch the spacing over time and have an instant feedback as I edit the ease in the Graph Editor.
Secondly, I animated the cannon ball. For both projects, I realised the difference between the motion of each ball (Webster C. 2005, Animation: The Mechanics of Motion, Chapter 1 Basic Principles, p. 34). The cannon ball would not bounce very high, due to its mass, that is the reason that i used the Graph Editor curves and Motion Trail to achieve the ease in and ease out, also the curvature of the motion. However, I did not know how to make the ball rotate and move at the same time to move the steps down, thus, I continued the bouncing.

In my opinion, this exercise was very efficient, because I worked with the ghosting but also with the motion trail, and I focused on the spacing even more.

References:

Webster C. (2005) Animation: The Mechanics of Motion. Elsevier/ Focal Press

Tennis Ball Videos

https://www.youtube.com/watch?v=sKJegbjS4N8

https://www.youtube.com/watch?v=HY_vLHoNTw4

Tuesday 10 February 2015

Squash and Stretch - Ball and Dinosaur


Critical Evaluation


This is the Squash Stretch Ball Dinosaur exercise playblast using Autodesk Maya.

Initially, I began with the dinosaur model animation because it was more complicated, thanks to the motion of different body parts and timings. I studied the demo version of this project and wrote a breakdown of each animated controller. Thus, I understood the way of how these parts are animated. Then, I started with the curves of the greater parts, such as the global and main body controllers because I wanted to create the major animations before going into detail. For the translation of these and feet rotation when the model makes contact with the ground and leaves it, I used the same timing as the example, because I understood clearly that the feet would need two keyframes to step and leave the floor for the sake of speed and momentum, and also the bounce was very well approached. However, for the rotation of feet as the dinosaur falls and elevates, also the rotation of head and neck, I used my own timing. My purpose was to set different timings for each animation, because no part of the body moves at the same time.
Secondly, the main objective of this exercise was the squash and stretch principle. Not only the translation and rotation of the main controller created this effect, but also the rotations of the neck and head enhanced this effect. This extension of the body as the model falls and elevates and its closed, passive pose when touching the ground, gave the impression of softness. In my opinion, these different states of the body also created the essence of follow through.
Finally, I also animated the bouncing ball and the the X translations of main body and feet.

This was a very effective exercise to study the example, figure out the hierarchy of each motion and try different timings. Furthermore, the squash and stretch principle I applied also helped me to experiment with various poses of the body to attach the feeling of impetus and follow through, also create a more natural and expressive animation, something that would be efficient for future projects.

Wednesday 4 February 2015

Timing Example

https://www.youtube.com/watch?v=gxJH33tjULE

Critical Evaluation


This is a timing example which I will make critical evaluation about.

Initially, the character does not seem to fly, but the clouds change position to create this effect, however, he seems to move a little as the camera approaches, but the motion is linear. In my opinion, the rotation of the arm has a constant speed, creating an unrealistic motion. Same as the character takes of his glasses and rotates his head. Timing is also very slow. This is due to the fact that many frames are used for the completion of all these motions.
Secondly, when the character approaches the aeroplane, the body finds no resistance on the air, which is probably a great force, as he seems to fly in high speed to reach the plane. The stretching of the body is linear, too. On the other side, maybe more frames would need to give the impression of attempt to move due to this pressure.

Bouncing Balls - Light and Heavy


Critical Evaluation


This is the Bouncing Balls - Light and Heavy exercise, using Autodesk Maya. For this project, I adjusted both timing and spacing to create the feel of different weights of the balls.

Firstly, the left one should be the heavy ball. Reading the reference material, I realised that timing is an aspect which is very important for the impression of weight. Thus, I changed both timings of the cube which pushes the ball, and of the ball itself, giving more frames for the motion to be completed. However, a problem occured on the rotation, because I did not know how to synchronise the rotation with the fall of the shelf, to create a more realistic motion. Despite this fact, I adjusted the spacing, forming an acceleration as the ball falls (10 frames to fall after it leaves the shelf) using the Graph Editor and changing the tangent types (weighted, broken and free tangent weight). In addition, the ball rises very little of the ground and bounces 2 times, moving a little bit, thus, giving the feel of its weight and its mass.
Secondly, the right ball should be the light one. I created an acceleration for both cube and ball, in order to show that this great force is acted on the ball which has a little inertia and resistance. Furthermore, using the Graph Editor again and changing the tangent types, I created an acceleration as it falls, and also some bounces, so the object decelerates as it rises and accelerate as it falls, travelling a greater distance than the heavier one, thanks to its little weight and mass. It rises higher than the heavy one, because it is lighter.

To sum up, with this exercise, I was more occupied with the Graph Editor and Ghosting to adjust and watch the spacing, respectively. I believe that I earned more experience on working with both timing and spacing, which will be a great help for future projects.

Cartoon - Physics Dropping Balls


Critical Evaluation

This is the Cartoon -  Physics Dropping Balls exercise, using Autodesk Maya. I used the same timing as the demo reference (24 frames for each ball to bounce), however, with different spacing for each one, also distorted the shape of the cartoon example for the sake of exaggeration.

Initially, the physics ball should obey the laws of motion, that is the reason that I did not distorted it in any way (squash, stretch). Additionally, I used the Graph Editor to change the splines to flat on its positions on the air and to linear when it hits the ground, thus, creating a gradual fall and rise, to form the effect of acceleration and deceleration. Furthermore, I adjusted the tangents: Weighted tangents and free tangent weight to have greater control over the motion and also broke them to have separate editing for each handle. I believe that the spacing of the physics ball is effective, as it gives the impression of gravity and weight, thanks to the ease in and out.
Secondly, the cartoon ball should portray a more exaggerated motion, bearing in mind the laws of motion to make it more believable. The spacing is appropriate enough to depict the feel of gravity, however, the squash and stretch as it bounces, attaches the object with some character. Nevertheless, the ball stays on the ground during the main distortion, because a rapid deformation could not be perceived.

Finally, I believe that I managed to create different attitudes for each ball with the same timing, only by adjusting spacing and shape. This exercise was an experience for me to deal with the timing and spacing of more complex objects.
 

Monday 26 January 2015

5 Statements to form my learning contract

During the Conventions of Animation module:

I will study the material to understand the 12 Principles better.

I will focus on the exercises to be occupied with the principles in practice.

I will get feedback as many times as possible.

I will apply all that I have learned on the mini projects to create good work.

I will focus on every aspect to become a better animator.

Cartoon Ball Bounce - Flipbook Exercise


Critical Evaluation

This is the Cartoon Ball Bounce flipbook exercise. I created it using post notes, scanned them and used Adobe Photoshop to crop and align them better. I hidden some parts which did not belong to the pages and created the final video using Adobe After Effects.

The timing is the same as the previous flipbook example (24 frames), but there are two great elements of this animation: Spacing and ball deformation.
Slow in and slow out are used for the impression of weight, as the distance between the frames becomes greater when the sphere falls and less when it bounces off the ground. The alignment using the software improved the spacing.
Additionally, the ball actually changes its shape for the purpose of the cartoony feel.
It begins as a circle and since the frame before it makes contact with the ground, it lengthens. This stretch provides the aspect of momentum due to gravity, in a more expressive way. At the frame when the ball touches the ground, it becomes eliptical, then it stretches again and gradually becomes a circular sphere when it reaches the air. Squash, and the stretch afterwards, give the feeling of force because the ball is distorted and impetus during the elevation, respectively.

Finally, this was a very good example of squash and stretch and exaggeration. This work could be very helpful for later projects, because these attempts of shape distortion gave me the opportunity to create animation using these principles and have a little experience when applying them into software.

Physics Ball Bounce - Flipbook Exercise


Critical Evaluation

This is my Physics Ball Bounce flipbook exercise. I drew the frames on post notes, scanned them and used Adobe Photoshop to crop and align them better. Furthermore, I masked some parts of the image in order to only contain the pages on the screen, and finally composited the video using Adobe After Effects.

Spacing is the most succesful element of this animation, because the poses of the ball stand off from each other gradually as the sphere reaches the ground, and the opposite as it reaches the air again. This distance between the frames, creates the slow in and slow out, giving the impression of weight, acceleration as it falls and deceleration as it rises. In addition, the alignment using the software could possibly improve the spacing.

Nevertheless, that was an interesting example of spacing and weight. The flipbook exercise could help in later, more complex projects using software, because it was a great opportunity for experimenting with these factors when drawing the sphere poses on the post notes.


Friday 23 January 2015

Greetings to everyone!

My name is Lekakis Themistoklis, I study BA Computer Animation and this is my blog for Conventions of Animation module.