Wednesday 25 February 2015

Diving into the Pool


Critical Evaluation 

This is the Anticipation - Diving into Pool exercise playblast, using Autodesk Maya. Due to some technical issues, I used the ball of the previous exercise (Anticipation - Small and Large) and its rig to animate it. I also hid the other ball and elements that I did not need in this particular scene. I modelled a simple ladder and a board, also a small pool using the Revolve tool, after shaping it by a CV curve, according to the demo video.

The main topic was the principle of anticipation. In addition, I used a video of diving athletes as a reference, because I wanted to challenge myself and try different kinds of motion. According to the video, the athletes run across the board, jump and stretch their arms vertically, bend down and jump off the board, rotate and dive into the water. This could be very difficult to animate, however, I anticipated the anticipation by stretching the ball before it squashes to leave the board. This could enhance the element of power building in order to jump. I stretched the sphere before the elevation and rotated it as it rises the air to make the impetus stronger. I created a slow in for the jump, and the distance between the last frame when it is on the board and the next one is great enough to demonstrate the power that was gathered during this anticipation. I squashed the ball when it is on the air because it comes to a more passive state due to the power, and stretched it again when it falls inside the pool, as it releases the energy which was built during the rotations on the air.

This exercise was a great challenge for me to try different kinds of motion, and also a very good opportunity to be occupied with the principle of anticipation, and manipulate squash, stretch and timing to make the motion as believable as it is possible.

Athletes Diving reference video:

https://www.youtube.com/watch?v=wTcatD-anCw


Small and Large Anticipation


Critical Evaluation

This is the Anticipation - Small and Large exercise playblast, using Autodesk Maya.

Firstly, the main focus for this project was the depiction of anticipation. As the task was to create a smaller and a larger anticipation, I decided to give a specific attitude to each of the balls by manipulating the squash and stretch, timing, ease in and out.
I began with the exaggerated example. According to the demo version, one of the balls was squashed and stretched intensely and left the ground very fast thanks to its power. Thus, I chose to follow this example on my first ball, however, I focused more on the timing from the start. The ball is squashed, but it needs some time to be flattened and it also stays in this position for another period of time. Thanks to this, it gives the impression of building its power to leave the floor. Additionally, it keenly stretches and elevates, demonstrating great force. As for the spacing, it slows in and out when flattens, thanks to its impetus and slows in when it jumps of the floor, portraying a great amount of speed due to the large anticipation.

For the second ball, I followed the small anticipation example. I squashed it a little, in order to demonstrate a weaker gather of energy to leave the ground. Due to this, it does not jump very high, despite the fact that I used slow in when it squashed. My purpose was to depict its thicker mass and harder material.

By the completion of this exercise, I was occupied with the principle of anticipation and I began to understand it better. Plus, I experimented with the timing for each action and the squash and stretch element more. I believe, that this experience would be helpful when I would apply them on character animation.

Slow In and Slow Out Tutorial


This is the tutorial of one of the previous exercises on slow in and slow out. I decided to make a tutorial with images and text explaining all of my steps for the completion of this project.
I apologise for the delay of this assessment.

The exercise is the SlowinOut Newton's Cradle and I used Autodesk Maya to complete it.

Initially, this is the scene with the cradle, lights and cameras.


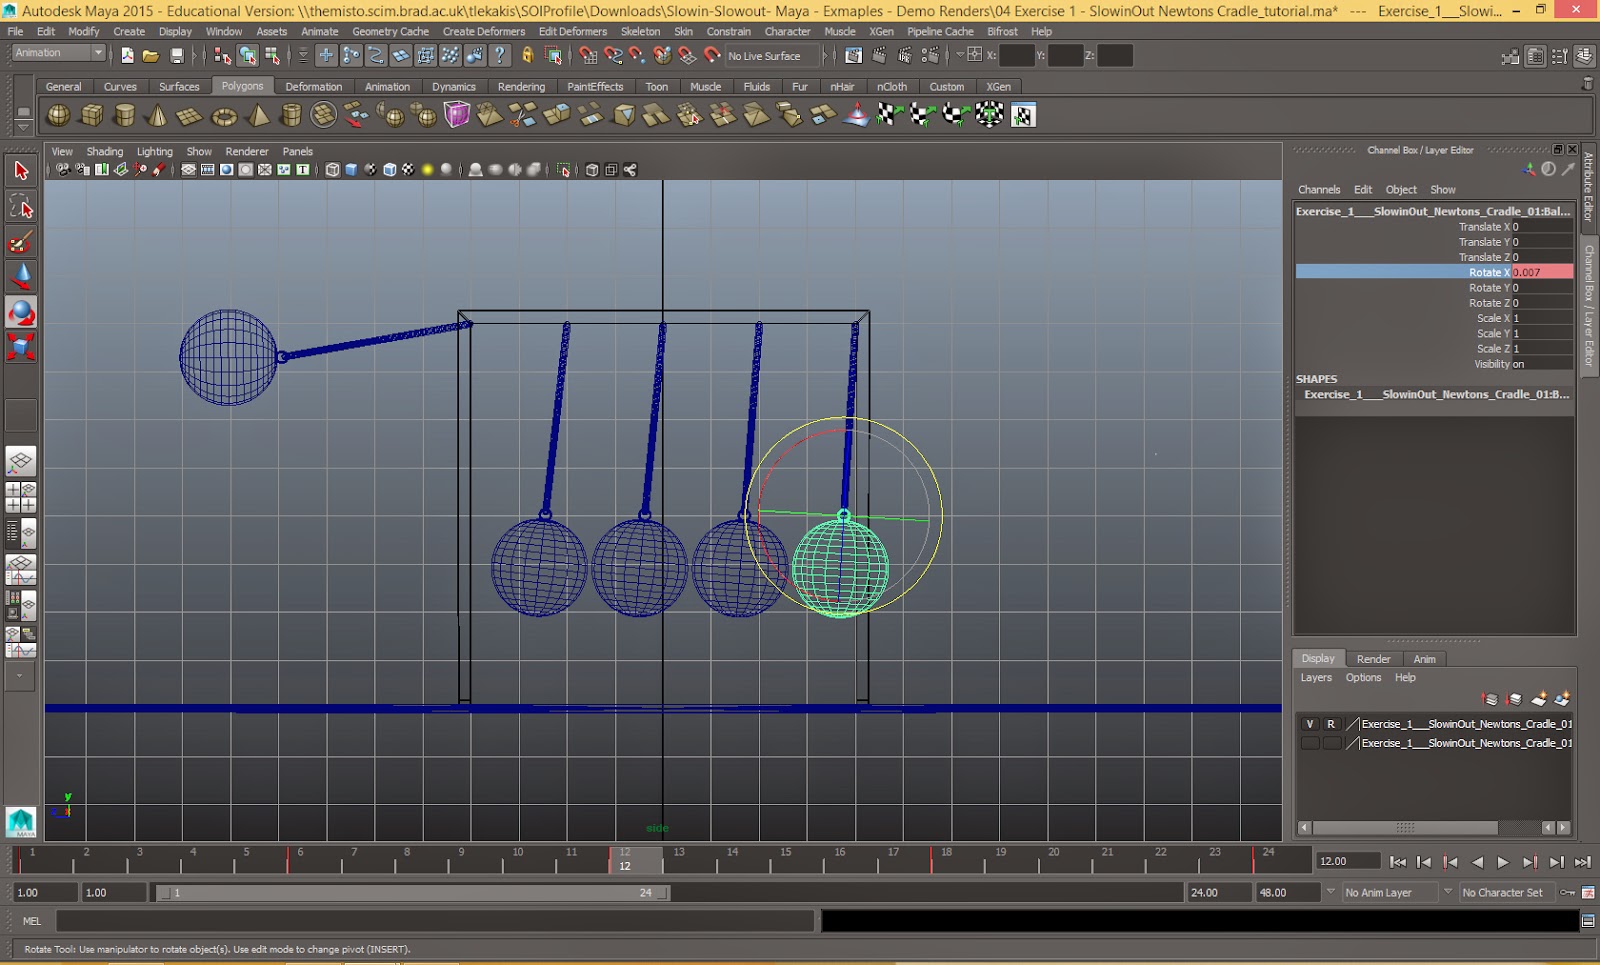
Begin by selecting each wire of the balls, except from the right one and set a keyframe on frame
1 by choosing the Rotate X attribute, right click on it and press Keyframe Selection. This will enable you to set a keyframe only on this value, because this is only needed for this animation. Go to frame 6 and rotate them in order to contact. This would create the motion of impetus as the energy is transferred through each ball. Select the right outer wire and set a keyframe on frame 1, then on frame 6 rotate it to contact the balls, and set a new keyframe. With this action, you have created the first hit of the one of the outer balls.


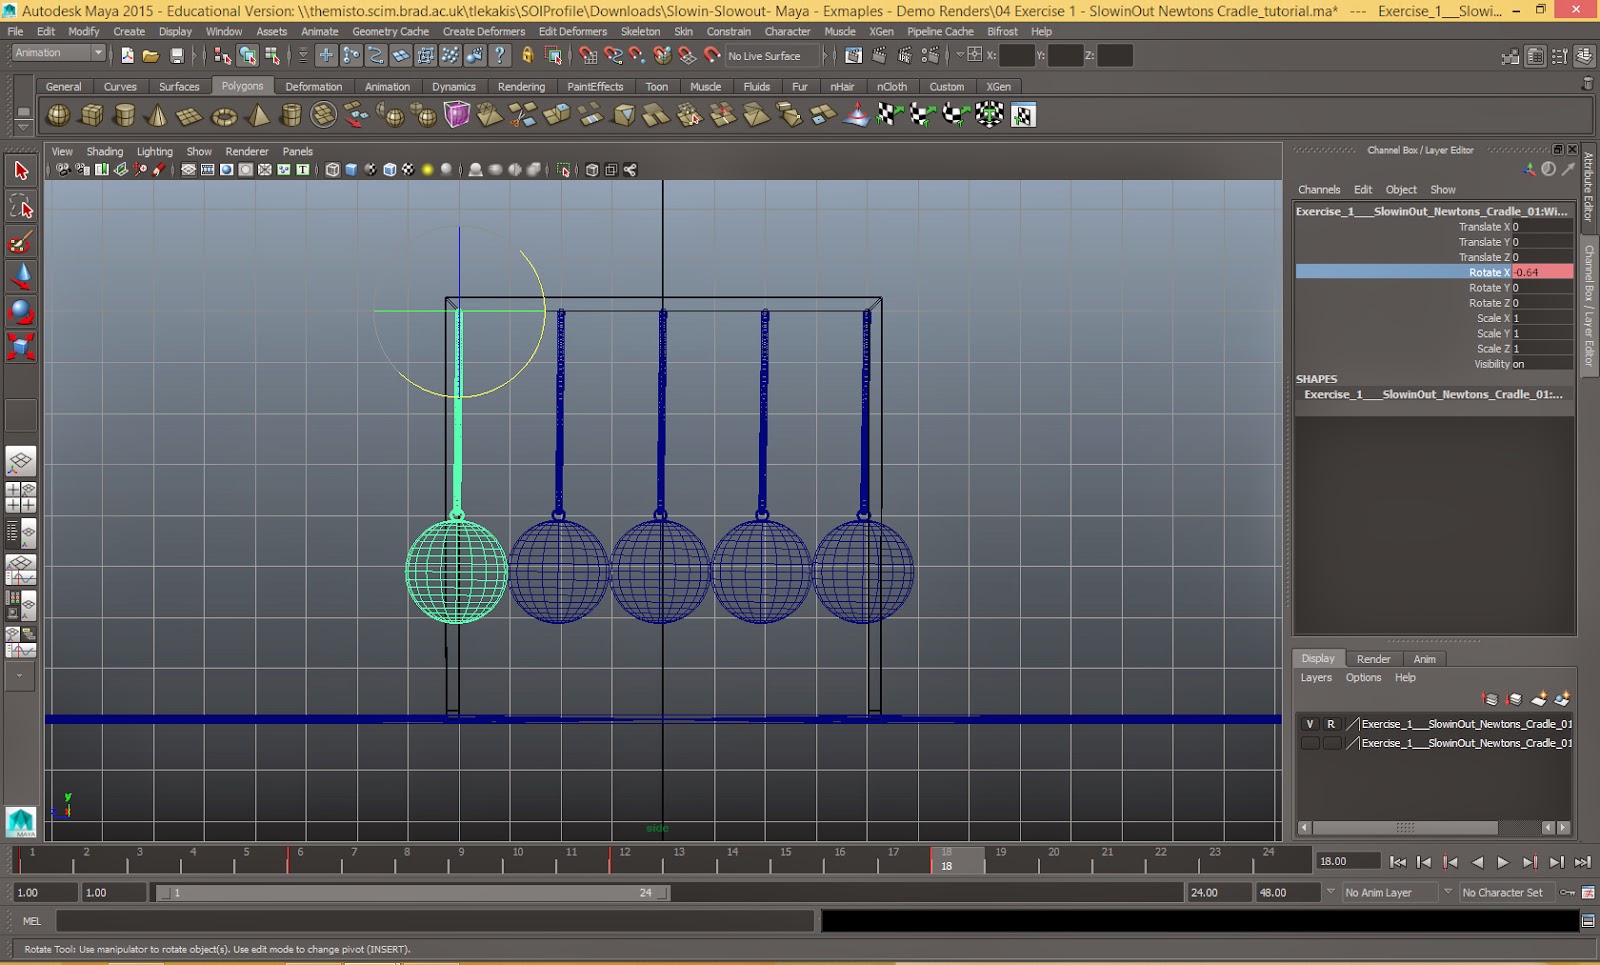
 Next, go to frame 12, rotate the wire of the left outer ball by -80 degrees and set a key. This is because this wire has to be rotated similar with the degrees of the opposite one, as the energy is firstly transferred with no reduction. Select the wires of the remaining balls and rotate them slightly to give the impression of the power transferred on frame 12 and set a key , and make them contact again on frame 18.


Additionally, animate the remaining wire to contact the other balls, 
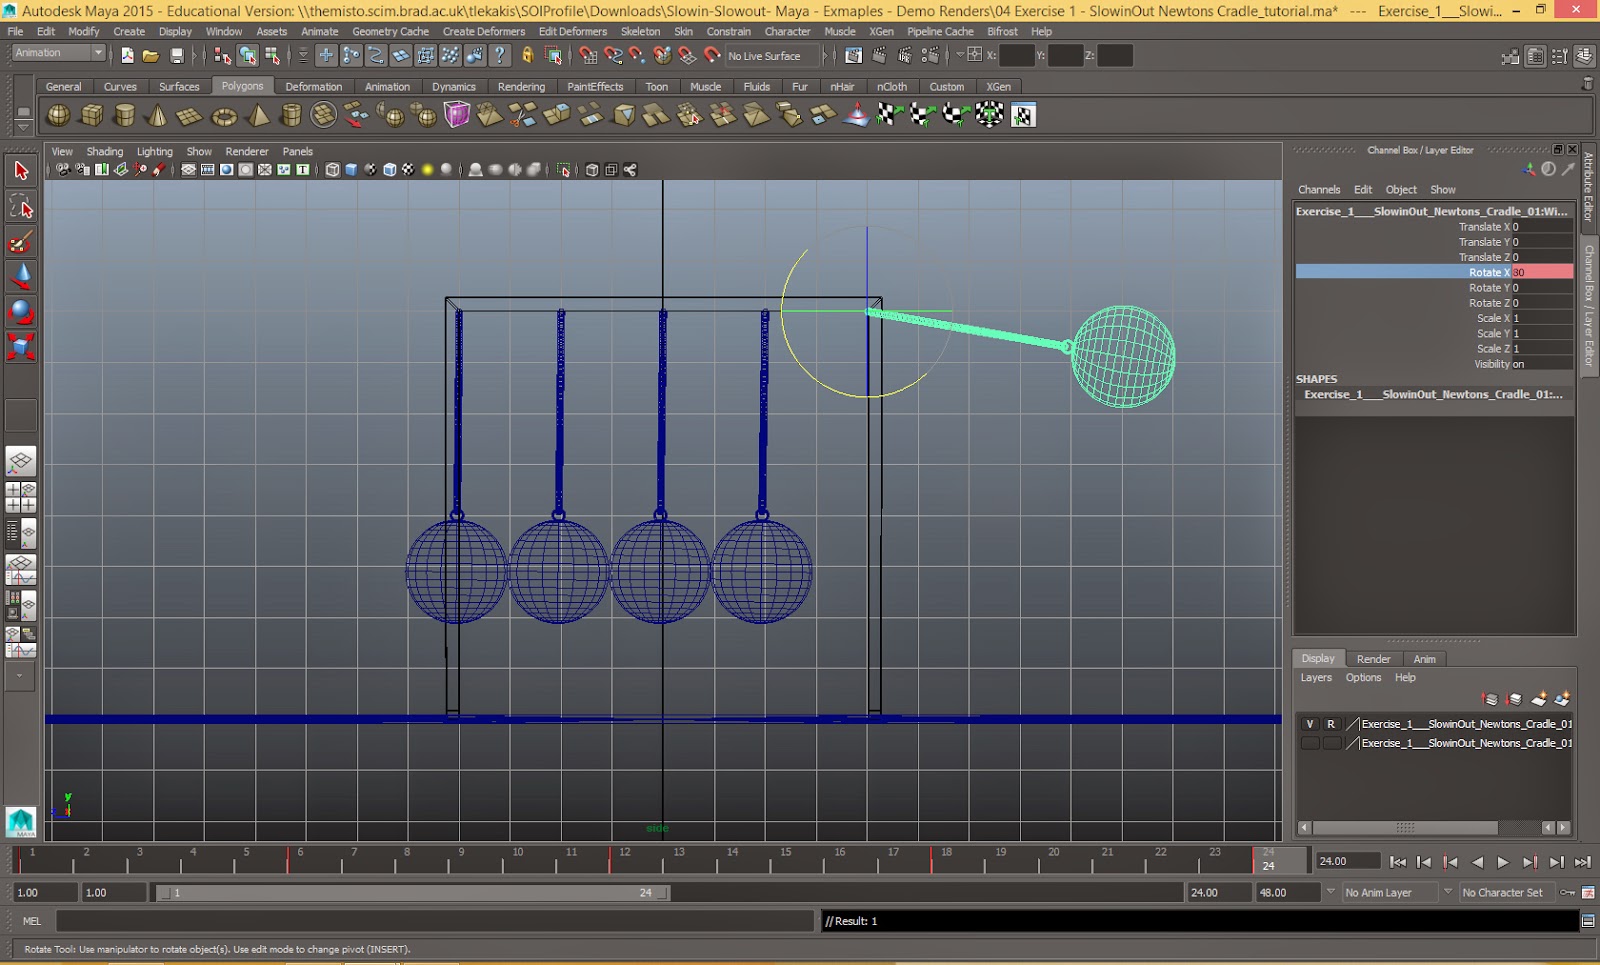
creating the second hit of the cradle on frame 18. Copy and paste the attributes of each object from frame 1 on frame 24, so when the loop animation is generated, the motion will repeat continuously.


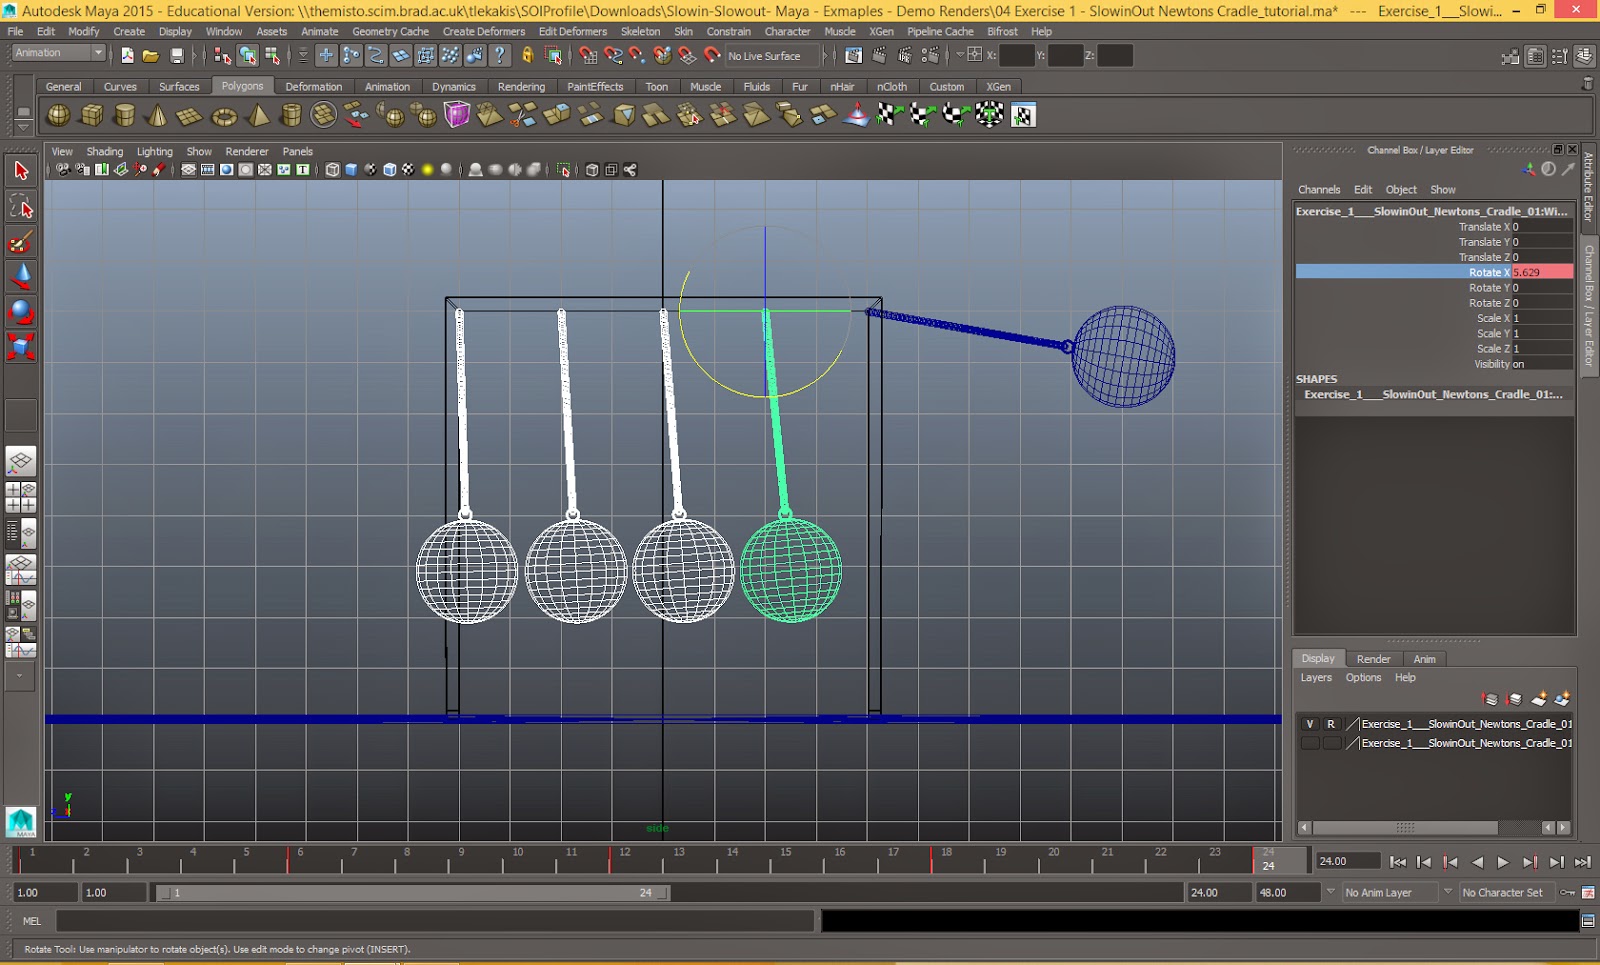
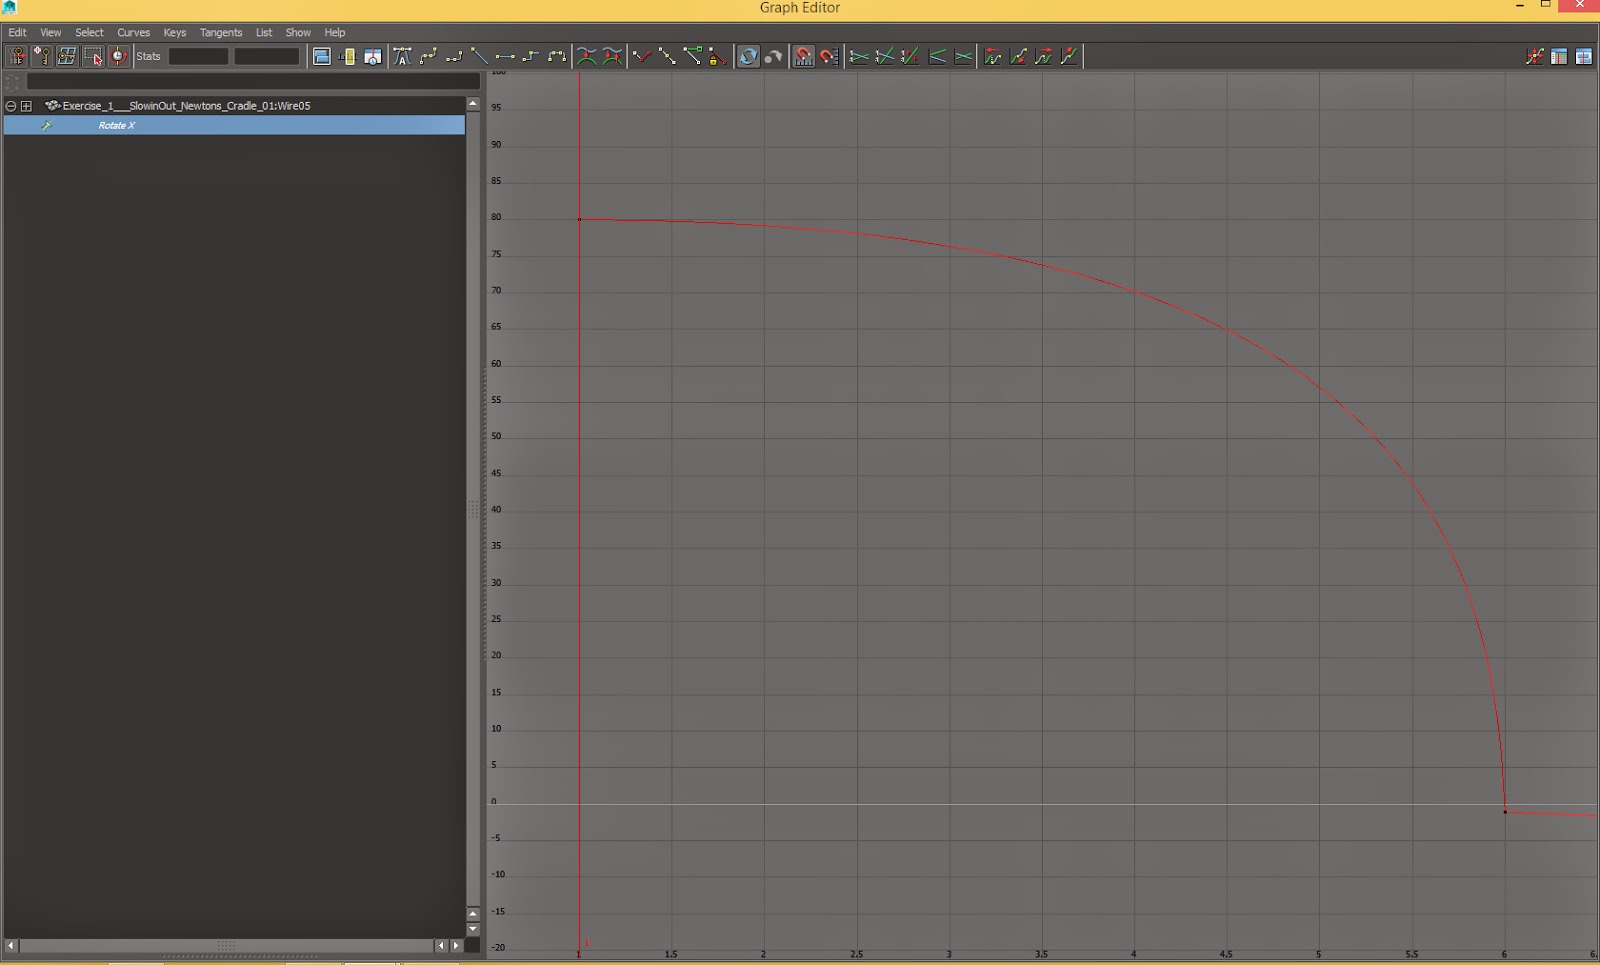
The timing is set, however, this is the moment to edit the spacing. Select the wire of the right ball on frame 1 and navigate to Window - Animation Editors - Graph Editor. Choose the Rotate X value from the menu on the right, so you can isolate only these curves (this would be more efficient if you had to animate different attribute of the same mesh) and draw a drag box to choose all of them . After that, navigate to the Curves menu, select Weighted Tangents, then navigate to the Tangents menu and select Break Tangents and Free Tangent Weight. This will make you have a greater control over the curve manipulation, also the broken tangents will enable you to edit each one separately, depending on each motion. The ball accelerates when hitting the balls, so select the tangent on frame 1 and make it Flat from the icons menu above, also select the tangent on frame 6 and make it Linear. Grab the handles to edit the curve, as the image shown, to reinforce the acceleration.


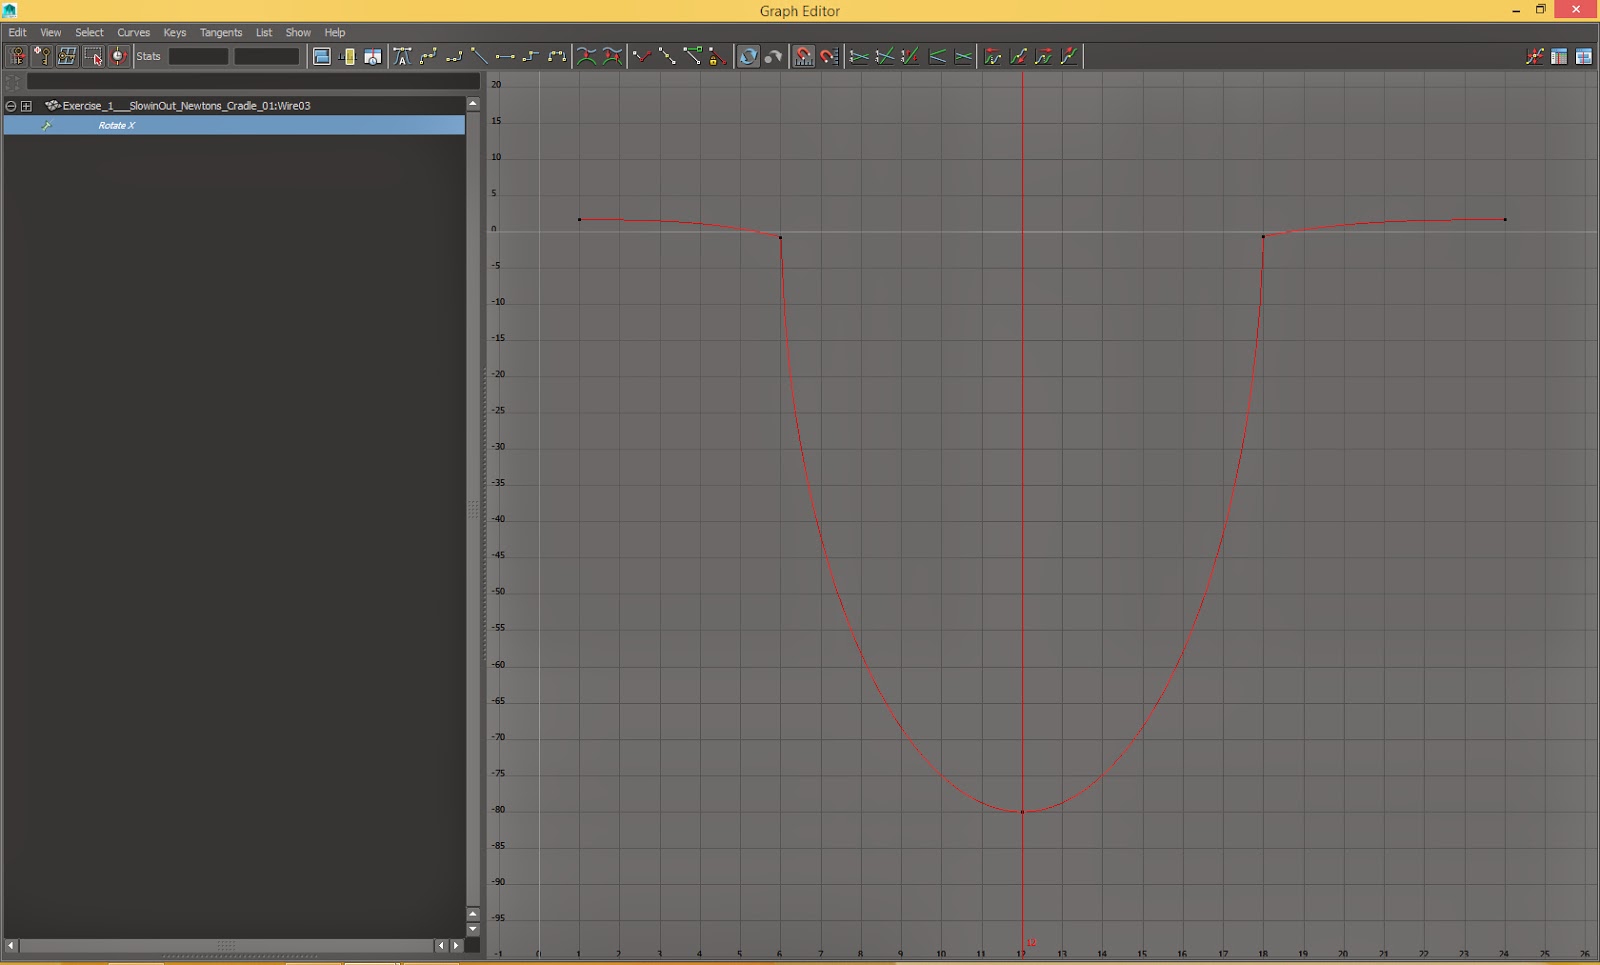
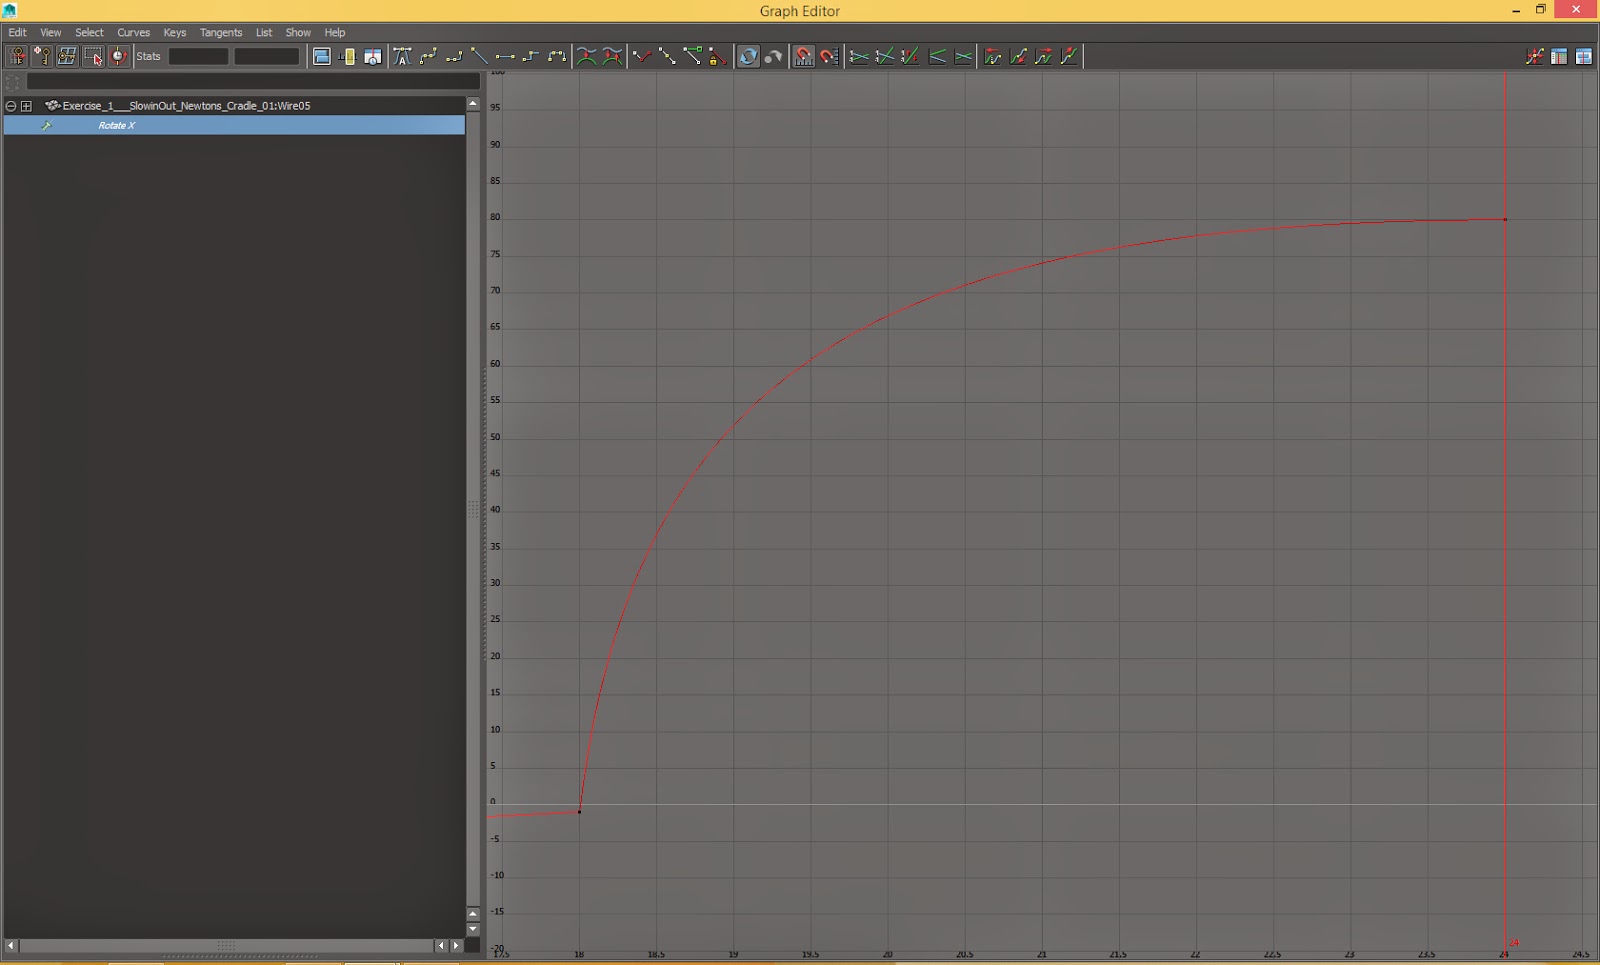
The animation of the other wire is the opposite. The energy is transferred on the left ball, so it moves very fast in the beginning and decelerates. Apply the same commands about the tangents, however, you could unify the tangents on frame 12 to make the changes of the ease at the same time when the ball reaches its extreme pose and accelerates again. Thus, make the tangent on frame 6 Linear, and the one on frame 12 flat and move the Flat ones by pressing the Shift button to maintain the handle horizontal and the frames close to each other, forming an ease in and an ease out from frames 6 to 12 and 12 to 18 respectively. Select the handle on frame 18 and make it Linear. Move the handles, as the image shown, to enhance the deceleration and the acceleration of the ball. Choose the right wire and create a deceleration, because the ball is hit and reaches its extreme pose again.


In order to improve your animation, you could choose the balls and set keyframes on rotations. This will create a smoother flow of the motion, and will depict the energy passing through the objects better. Edit the curves in the Graph Editor according to the ones of the wires, in order to create a coherent motion.


Grab the little box of the Range Slider on the right and make the viewable timeline shorter to 1-23 frames. Because the frames 1 and 24 are the same, the final playblast video would play the same frame two times and the animation would appear very odd. Right click on the timeline, choose Playblast to create the animation.

This is the playblast of the complete animation.


Wednesday 18 February 2015

Slow In - Out Newton's Cradle


Critical Evaluation 


This is the SlowinOut Newtons Cradle exercise. I used Autodesk Maya to complete the animation.

The basic principle for this project was the Slow In and Slow Out. After watching a reference video in 300 fps, I realised that the middle balls of the cradle actually move. Thus, I rotated the outer ones which hit the others, but I also animated the rest of them in order to create a more believable motion. I manipulated the splines using the Graph Editor and formed an ease in as the ball is hit and ease out when it hits the other balls. The combination of both slow in and out give a more natural impression of movement. Furthermore, I rotated the outer balls and enhanced the flow of the motion.

Thanks to this exercise, I was occupied with the Graph Editor, spacing, and I also had the opportunity to focus on the reference video in order to understand the motion better.

Tennis and Cannon Balls Falling Stairs


Critical Evaluation

This is the Tennis and Cannon Ball Falling Stairs project. I created this animation using Autodesk Maya.

Initially, the most important principle was the slow in and slow out. I watched some videos and used them as a reference for the tennis ball animation and observed that the ball makes a quick bounce. In order to achieve this, I used the Graph Editor and manipulated the splines by making them flat on the top and linear as the ball makes contact with the stairs and leaves it. As for the timing, I believe that 8 frames are appropriate for the first falls, but the ones in the end where shorter as the ball loses its momentum. Additionally, I created Motion Trail because I wanted to change the modify the movement interactively inside the viewport. This command also enabled me to edit the curvature of the bounces. Furthermore, I created ghosting in order to watch the spacing over time and have an instant feedback as I edit the ease in the Graph Editor.
Secondly, I animated the cannon ball. For both projects, I realised the difference between the motion of each ball (Webster C. 2005, Animation: The Mechanics of Motion, Chapter 1 Basic Principles, p. 34). The cannon ball would not bounce very high, due to its mass, that is the reason that i used the Graph Editor curves and Motion Trail to achieve the ease in and ease out, also the curvature of the motion. However, I did not know how to make the ball rotate and move at the same time to move the steps down, thus, I continued the bouncing.

In my opinion, this exercise was very efficient, because I worked with the ghosting but also with the motion trail, and I focused on the spacing even more.

References:

Webster C. (2005) Animation: The Mechanics of Motion. Elsevier/ Focal Press

Tennis Ball Videos

https://www.youtube.com/watch?v=sKJegbjS4N8

https://www.youtube.com/watch?v=HY_vLHoNTw4

Tuesday 10 February 2015

Squash and Stretch - Ball and Dinosaur


Critical Evaluation


This is the Squash Stretch Ball Dinosaur exercise playblast using Autodesk Maya.

Initially, I began with the dinosaur model animation because it was more complicated, thanks to the motion of different body parts and timings. I studied the demo version of this project and wrote a breakdown of each animated controller. Thus, I understood the way of how these parts are animated. Then, I started with the curves of the greater parts, such as the global and main body controllers because I wanted to create the major animations before going into detail. For the translation of these and feet rotation when the model makes contact with the ground and leaves it, I used the same timing as the example, because I understood clearly that the feet would need two keyframes to step and leave the floor for the sake of speed and momentum, and also the bounce was very well approached. However, for the rotation of feet as the dinosaur falls and elevates, also the rotation of head and neck, I used my own timing. My purpose was to set different timings for each animation, because no part of the body moves at the same time.
Secondly, the main objective of this exercise was the squash and stretch principle. Not only the translation and rotation of the main controller created this effect, but also the rotations of the neck and head enhanced this effect. This extension of the body as the model falls and elevates and its closed, passive pose when touching the ground, gave the impression of softness. In my opinion, these different states of the body also created the essence of follow through.
Finally, I also animated the bouncing ball and the the X translations of main body and feet.

This was a very effective exercise to study the example, figure out the hierarchy of each motion and try different timings. Furthermore, the squash and stretch principle I applied also helped me to experiment with various poses of the body to attach the feeling of impetus and follow through, also create a more natural and expressive animation, something that would be efficient for future projects.

Wednesday 4 February 2015

Timing Example

https://www.youtube.com/watch?v=gxJH33tjULE

Critical Evaluation


This is a timing example which I will make critical evaluation about.

Initially, the character does not seem to fly, but the clouds change position to create this effect, however, he seems to move a little as the camera approaches, but the motion is linear. In my opinion, the rotation of the arm has a constant speed, creating an unrealistic motion. Same as the character takes of his glasses and rotates his head. Timing is also very slow. This is due to the fact that many frames are used for the completion of all these motions.
Secondly, when the character approaches the aeroplane, the body finds no resistance on the air, which is probably a great force, as he seems to fly in high speed to reach the plane. The stretching of the body is linear, too. On the other side, maybe more frames would need to give the impression of attempt to move due to this pressure.

Bouncing Balls - Light and Heavy


Critical Evaluation


This is the Bouncing Balls - Light and Heavy exercise, using Autodesk Maya. For this project, I adjusted both timing and spacing to create the feel of different weights of the balls.

Firstly, the left one should be the heavy ball. Reading the reference material, I realised that timing is an aspect which is very important for the impression of weight. Thus, I changed both timings of the cube which pushes the ball, and of the ball itself, giving more frames for the motion to be completed. However, a problem occured on the rotation, because I did not know how to synchronise the rotation with the fall of the shelf, to create a more realistic motion. Despite this fact, I adjusted the spacing, forming an acceleration as the ball falls (10 frames to fall after it leaves the shelf) using the Graph Editor and changing the tangent types (weighted, broken and free tangent weight). In addition, the ball rises very little of the ground and bounces 2 times, moving a little bit, thus, giving the feel of its weight and its mass.
Secondly, the right ball should be the light one. I created an acceleration for both cube and ball, in order to show that this great force is acted on the ball which has a little inertia and resistance. Furthermore, using the Graph Editor again and changing the tangent types, I created an acceleration as it falls, and also some bounces, so the object decelerates as it rises and accelerate as it falls, travelling a greater distance than the heavier one, thanks to its little weight and mass. It rises higher than the heavy one, because it is lighter.

To sum up, with this exercise, I was more occupied with the Graph Editor and Ghosting to adjust and watch the spacing, respectively. I believe that I earned more experience on working with both timing and spacing, which will be a great help for future projects.

Cartoon - Physics Dropping Balls


Critical Evaluation

This is the Cartoon -  Physics Dropping Balls exercise, using Autodesk Maya. I used the same timing as the demo reference (24 frames for each ball to bounce), however, with different spacing for each one, also distorted the shape of the cartoon example for the sake of exaggeration.

Initially, the physics ball should obey the laws of motion, that is the reason that I did not distorted it in any way (squash, stretch). Additionally, I used the Graph Editor to change the splines to flat on its positions on the air and to linear when it hits the ground, thus, creating a gradual fall and rise, to form the effect of acceleration and deceleration. Furthermore, I adjusted the tangents: Weighted tangents and free tangent weight to have greater control over the motion and also broke them to have separate editing for each handle. I believe that the spacing of the physics ball is effective, as it gives the impression of gravity and weight, thanks to the ease in and out.
Secondly, the cartoon ball should portray a more exaggerated motion, bearing in mind the laws of motion to make it more believable. The spacing is appropriate enough to depict the feel of gravity, however, the squash and stretch as it bounces, attaches the object with some character. Nevertheless, the ball stays on the ground during the main distortion, because a rapid deformation could not be perceived.

Finally, I believe that I managed to create different attitudes for each ball with the same timing, only by adjusting spacing and shape. This exercise was an experience for me to deal with the timing and spacing of more complex objects.